
So you’ve developed a snazzy new Serverless API on AWS and everything is going great. That is until you realize that there might eventually be production data behind it that you don’t want someone with Postman and 20 minutes on their hands to have access to. That’s where Lambda Authorizers come in. They’re a way to make sure that your API will only respond to authorized callers. Let’s look at how to implement authorizers for ourselves using an example application called Serverless Jams - where we vote on our favorite coding-related music.
Resources and Tools
In this example, I’ll be working with the Serverless Framework to spin up my API and front end and Auth0 in order to add user sign ups. The examples I’m creating should be within the free tiers of these two different services as of publishing this post, but always make sure to check on the most recent pricing if you’re price sensitive. The project will require Python, Node.js and NPM installed.
If you’ve never used the Serverless Framework you can check out my Pluralsight Course or review some free courses on Serverless Learn to get started. In particular, I have an entire video series on building a very similar application from scratch here. That course will take you through building the entirety of the application, and explain how to get it running on AWS with a custom domain.
Our Project Structure
So what does this project look like? You can find the code for this particular blog post here. The code should look like this:
.
├── README.md
├── backend
│   ├── auth.py
│   ├── get_song_vote_counts.py
│   ├── get_token.py
│   ├── record_song_vote.py
│   └── verify_token.py
├── frontend
│   ├── auth_config.json
│   ├── css
│   │   └── main.css
│   ├── index.html
│   └── js
│       ├── app.js
│       └── auth0.js
├── package.json
├── requirements.txt
└── serverless.yml
There’s a little bit going on so let’s tackle everything bit by bit starting with the frontend directory.
The Frontend
Here’s what it looks like when I run a webserver inside of the frontend directory (if you have Python3 installed you can run python3 -m http.server from inside frontend to do this).
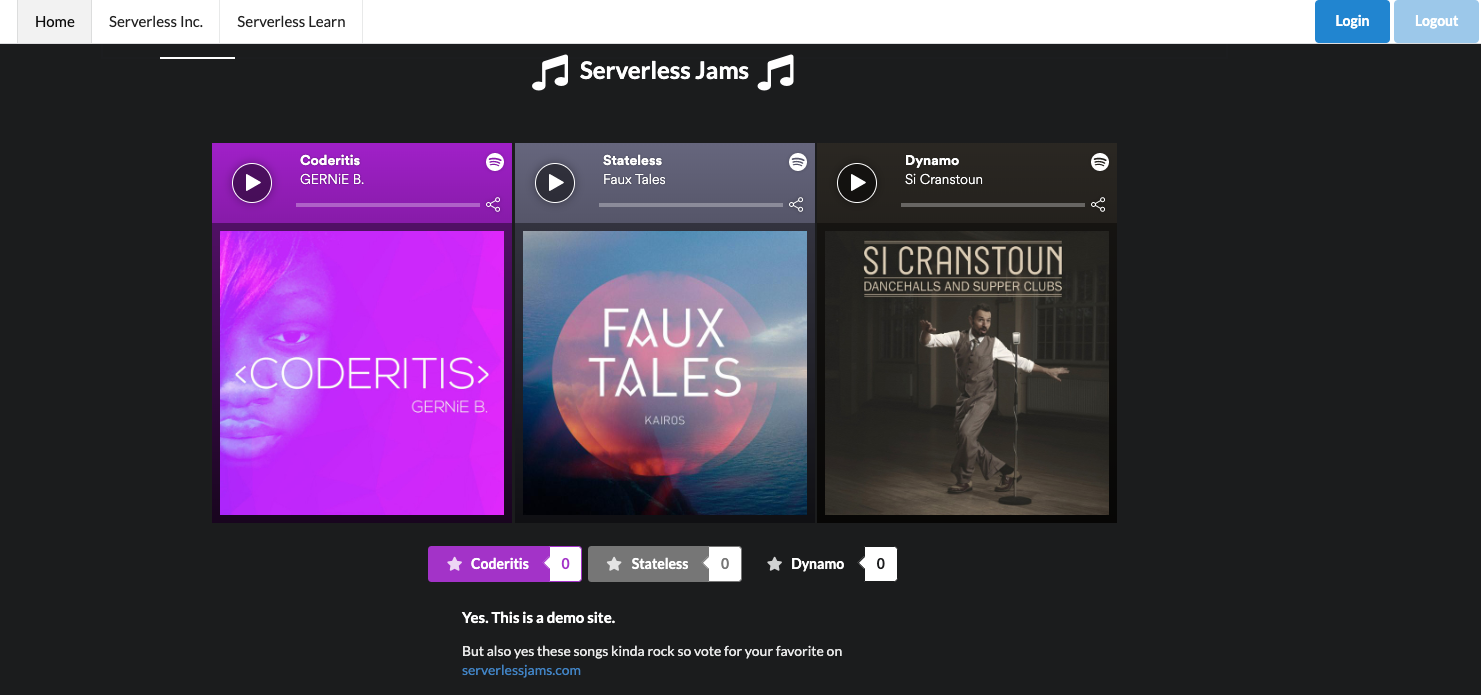
Basically, it’s a simple UI that shows vote counts for different songs and allows us to listen to them with Spotify embeds. It also has hidden UI elements that will reveal themselves when we sign in and allow us to vote for our favorites. So what’s the big deal here? Why do we need to add authorizers? Well imagine we were having some sort of contest, do we want to let just anyone vote without signing in? Probably not! That’s why we need the authorizers.
The first step in enabling this is allowing users of our site to sign in. We’re going to enable that using auth0.js and making sure we have configuration values in auth_config.json. Let’s get those configuration values first!
Setting up the Auth0 Application
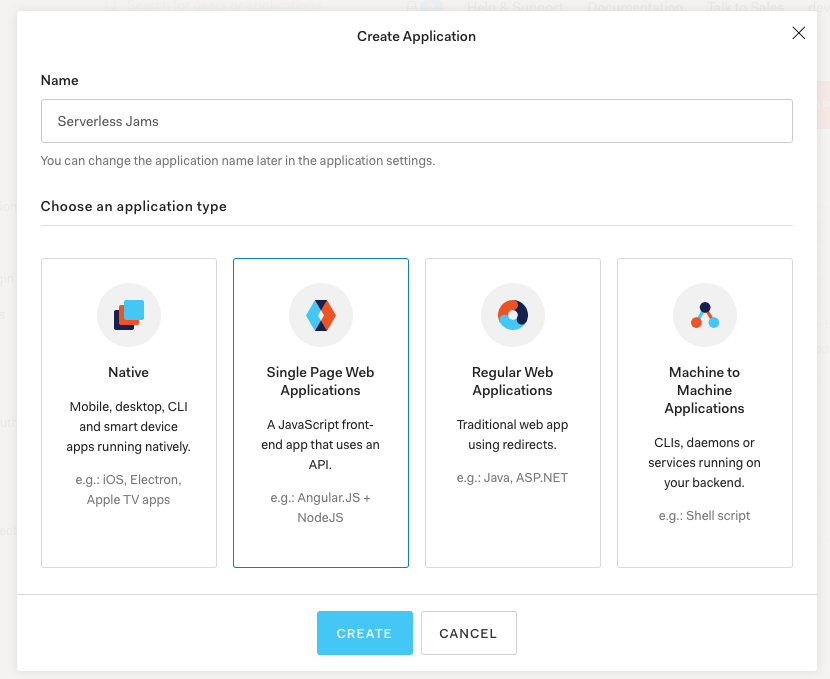
First, we need to create an Auth0 account. After that we need to create an Auth0 application and populate it with a few configuration values. There should be a big “Create Application” button we can press:
After that we can name the application and select “Single Page Web Applications” and “Create”.
Then, you can choose to read over the quickstarts if you’d like to adapt this demo for your preferred frontend. But I’ll be going straight to the settings to grab a few configuration values:
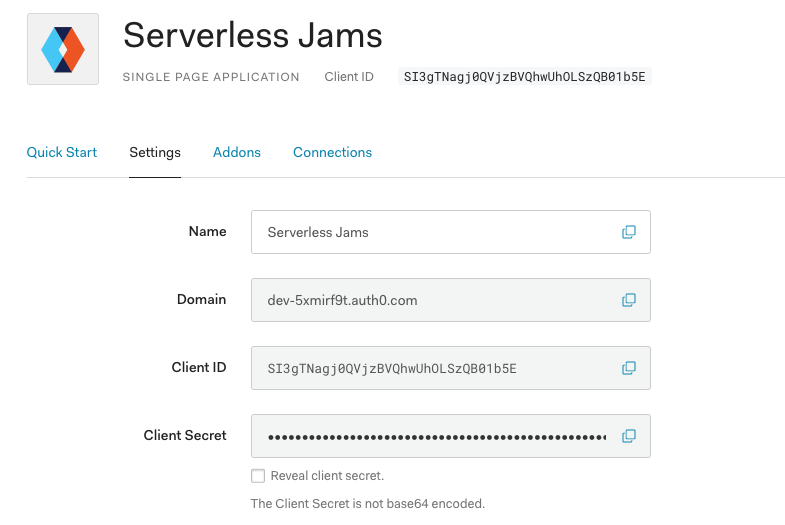
Specifically, I’ll want to copy the Domain and Client ID values and then add them to my auth_config.json file like this:
{
    "domain": "dev-5xmirf9t.auth0.com",
    "clientId": "SI3gTNagj0QVjzBVQhwUhOLSzQB01b5E",
    "audience": "REPLACE_ME"
}
Next, I’ll need to make a few configuration changes to this application so we can use it with our local frontend. I’ll start by scrolling down the settings page above and looking for “Allowed Callback URLs”, “Allowed Web Origins”, and “Allowed Logout URLs”. In each of those sections I’ll need to set any domain that I will be using. In my case that might include:
- Whatever localhost url I use for local testing:
http://localhost:8000 - The any subdomains of my domain like
wwworapp:https://www.serverlessjams.com - The domain itself without any subdomain:
https://serverlessjams.com
Keep in mind, these must be comma separated, and include the proper protocol prefix (http or https). You’ll also need to include the port for those localhost connections. For this demo you can just include http://localhost:8000 or whatever the port is for your local webserver that runs the frontend code such as http://localhost:3000.
Here’s an example you might use later on with custom domains:
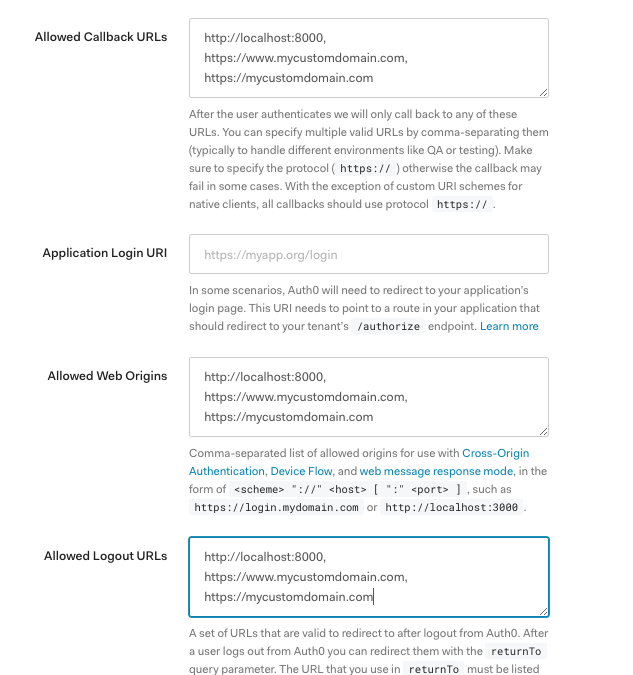
Don’t forget to scroll down and save these settings when you’re done!
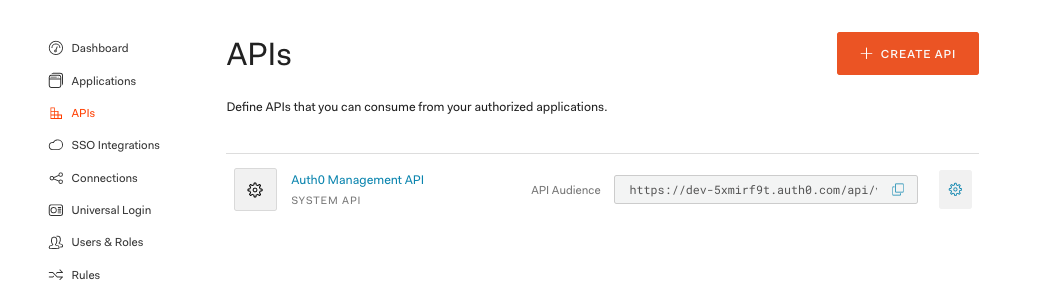
Setting up the Auth0 API
Next, we’re going to create an Auth0 API that we can use from our frontend application. Go to the APIs section on the left of the UI and click “Create API”:
Then configure the API with a name and an API identifier. This will really just be a way to tell which API you’re referencing later on so make it descriptive to whatever you’d like to associate it with. In this demo I’ll use serverlessjams-vote-api to make sure that we know it’s related to the ability to vote with the API we’ll create with the Serverless Framework. You can leave the algorithm the same as RS256.
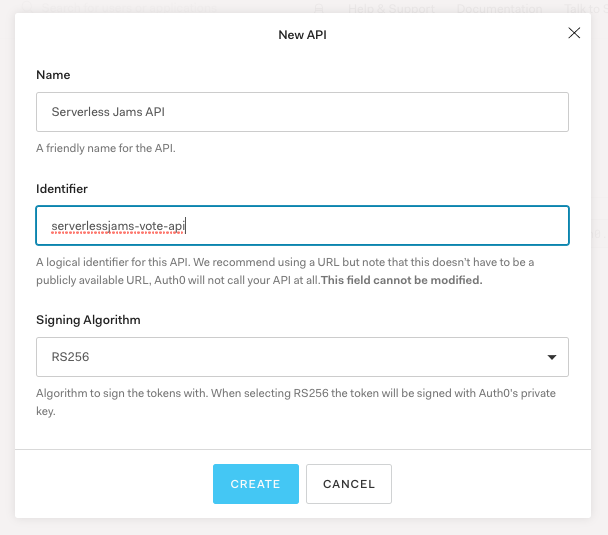
When we’re done with this we can then copy the Identifier we set into auth_config.json:
{
    "domain": "dev-5xmirf9t.auth0.com",
    "clientId": "SI3gTNagj0QVjzBVQhwUhOLSzQB01b5E",
    "audience": "serverlessjams-vote-api"
}
Testing out Our Frontend
With all these configuration values we can now test our frontend! Let’s spin it up locally. Change directories into the frontend directory and then spin up a webserver. Make sure that the address used locally is the same as what you configured in the earlier steps in Auth0. For example, mine should be port 8000. You can use python3 -m http.server as a simple way to get this working.
If your frontend is still working from earlier - cool! Just make sure to give it a hard refresh to clear the cache so we load in the new configuration values from auth_config.json.
You’ll be able to tell if this works when you try to log in by pressing the “Login” button in your local application. If you see your domain from Auth0 in the URL bar it worked! For example, mine starts with https://dev-5xmirf9t.auth0.com/login?state=. If you see something like https://example-replace-me.auth0.com/ you still need to hard refresh the page or make sure you saved auth_config.json.
After you press login you should see this page:

You can use this page to create your own user account of your own application! After you sign up or press login you’ll also probably see this page:
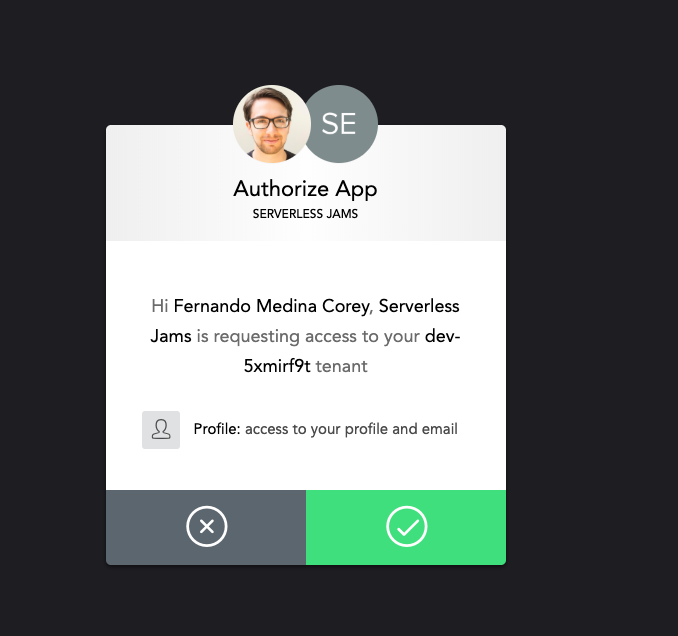
Go ahead and press accept, this is just a byproduct of our localhost testing. We shouldn’t see this page in production after we removed the localhost from the fields we configured in the Settings for our Auth0 Application earlier on.
Now that we’re signed in you’ll notice the UI has updated! We can now see a handy vote button and selector that will allow us to vote on the different songs! This is all happening because our JavaScript is checking to see if there is a signed-in Auth0 user.
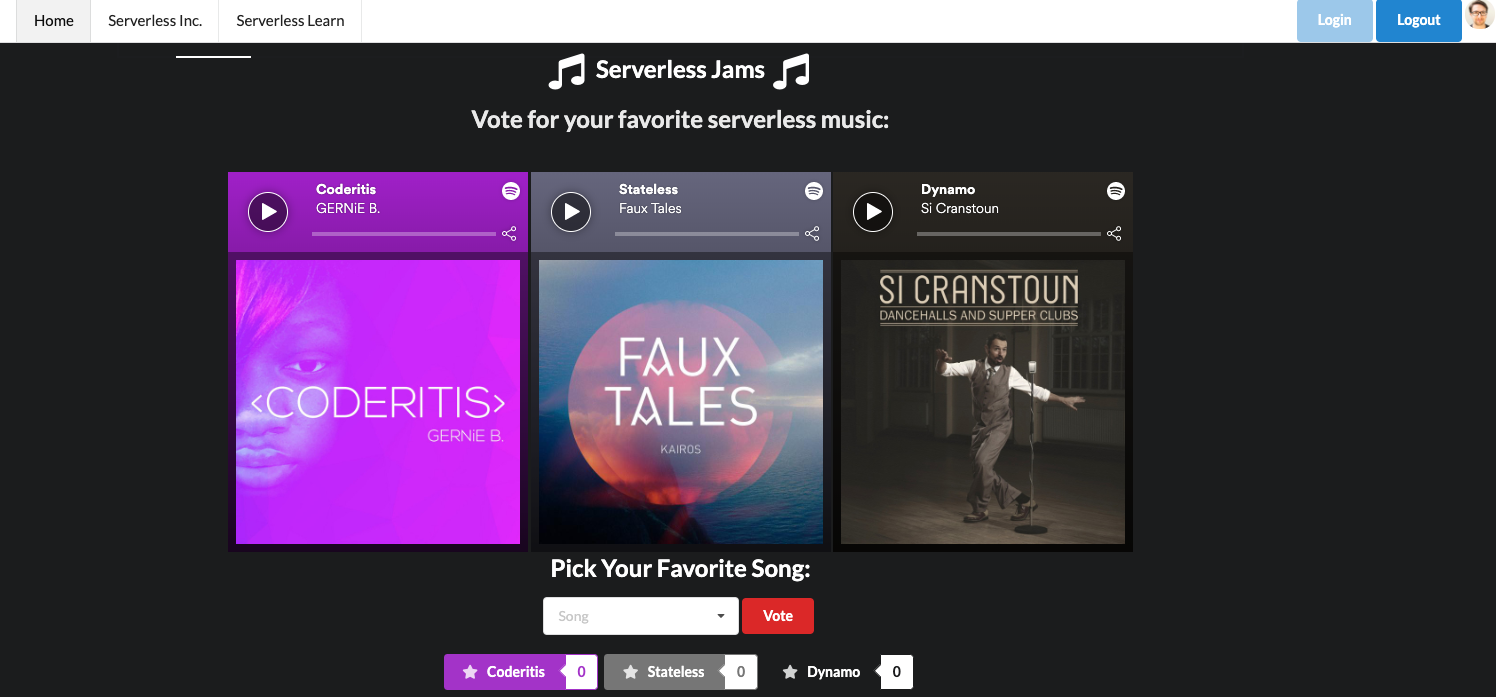
The JavaScript also updates the top right corner of the screen and adds my profile image because I’m signing in with Google and that profile image is available in the information returned from that sign in.
So this is all cool, but how does it work? Let’s take a look at how we get all this information.
First, our application loads in the auth0-spa-js library from the Auth0 CDN inside of our index.html:
<script src="https://cdn.auth0.com/js/auth0-spa-js/1.2/auth0-spa-js.production.js"></script>
Then, auth0.js loads the configuration values from auth_config.json and creates an Auth0 client:
let auth0 = null;
const fetchAuthConfig = () => fetch("/auth_config.json");

const configureClient = async () => {
  const response = await fetchAuthConfig();
  const config = await response.json();

  auth0 = await createAuth0Client({
    domain: config.domain,
    audience: config.audience,
    client_id: config.clientId,
  });
};
This client is used to redirect the user to Auth0’s sign in page when they click the “Login” button:
const login = async () => {
  await auth0.loginWithRedirect({
    redirect_uri: window.location.origin
  });
};
This sends the page to https://dev-5xmirf9t.auth0.com/login?/state=..... Where the user signs in and is then redirected back to the URL they came from with two query params code and state that look something like this:
http://localhost:8000/?code=42asdygjkah24ftyas&state=jahsdgjhgasd654123asdtfuyASTF%3D%3D
When the frontend sees a URL that contains both code= and state= is runs the auth0.handleRedirectCallback() function in order to process those values and update the auth0 client with that information before updating the UI with updateUI().
window.onload = async () => {
  await configureClient();
  updateUI();
  const query = window.location.search;
  if (query.includes("code=") && query.includes("state=")) {
    // Process the login state
    await auth0.handleRedirectCallback();
    updateUI();
    // Use replaceState to redirect the user away and remove the querystring parameters
    window.history.replaceState({}, document.title, "/");
  }
};
Whenever updateUI() is called this checks if the user is logged in with the auth0.isAuthenticated() method that is provided by the auth0-spa-js library. This allows it to go back over all the HTML, and determine if the hidden elements should be revealed and which of the login/logout buttons should be disabled or enabled.
const updateUI = async () => {
  const isAuthenticated = await auth0.isAuthenticated();

  document.getElementById("btn-logout").disabled = !isAuthenticated;
  document.getElementById("btn-login").disabled = isAuthenticated;

  if (isAuthenticated) {
    document.getElementById("gated-content-1").classList.remove("hidden");
    document.getElementById("gated-content-2").classList.remove("hidden");

    const claims = await auth0.getIdTokenClaims()
    const pictureUrl = claims.picture

    document.getElementById("avatar-img").src = pictureUrl || 'https://icon-library.net/images/icon-of-music/icon-of-music-8.jpg';
    document.getElementById("avatar-img-div").classList.remove("hidden")

  } else {
    document.getElementById("gated-content-1").classList.add("hidden");
    document.getElementById("gated-content-2").classList.add("hidden");
  }
};
If the user is authenticated then auth0.getIdTokenClaims() will get general information about the user including a profile picture if present. Otherwise it will fallback to an image of a music note and set that as a profile image before revealing the profile avatar image div. You can test this out yourself and examine the result of auth0.getIdTokenClaims() in the inspector console of your web browser after signing in:
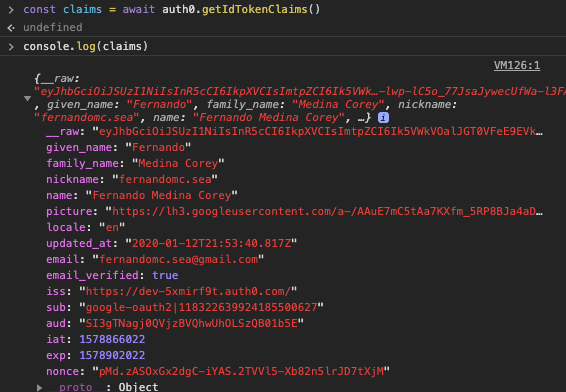
This helps us update the UI with any relevant profile information, but we also need to be able to eventually authenticate our frontend user to the backend. To do this, we’ll need a JSON Web Token that we get from running auth0.getTokenSilently():
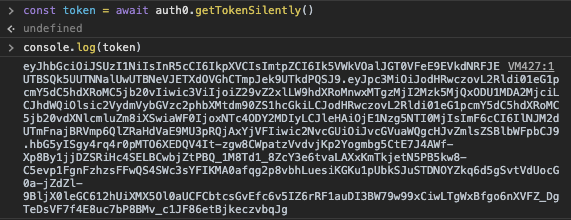
Your token should look similar and should have three parts separated by a period. To make sure that you’re set up correctly you can copy and paste your token into a site like jwt.io. You can scroll down a bit and use the JWT Debugger on the homepage:
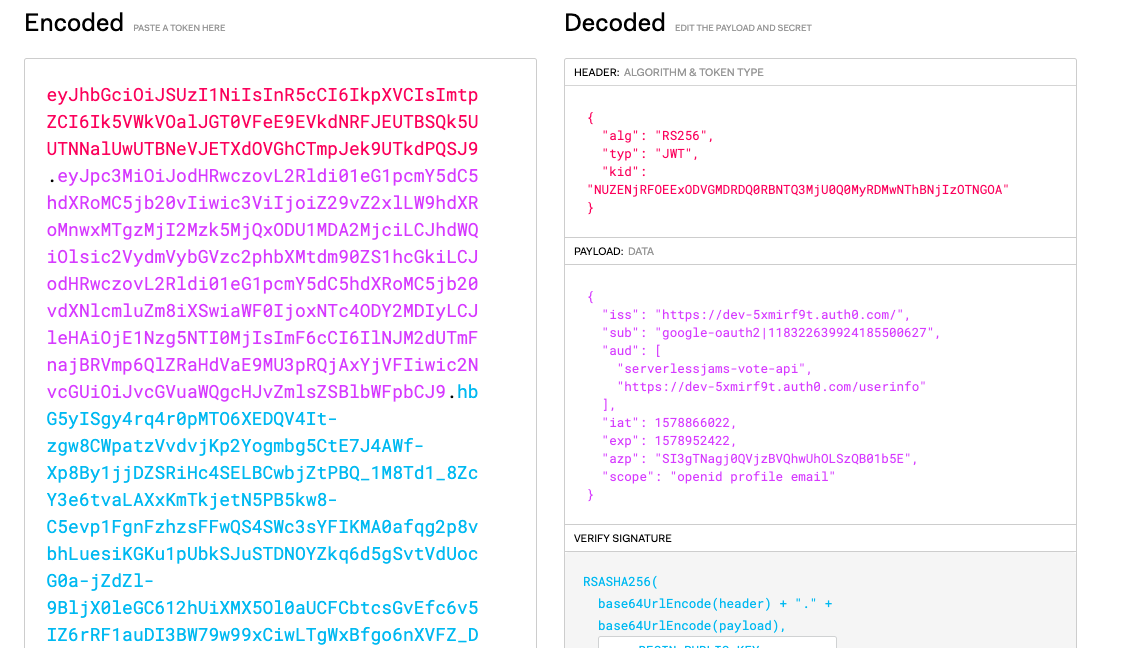
You should see two audiences here in the aud property as shown in the image:
- The
serverlessjams-vote-apiwhich is the API Identifier we set earlier and - The
/userinfoURL, which will allow us to get the profile information that we were looking at in the token claims on the backend
If these are both present this token is exactly what we need in order to process the backend API requests! Next, we can deploy our backend, and then make one final update to the frontend in order to get it working with the backend API endpoints.
Deploying Our Backend
Now that we’re ready to work on our backend let’s take a closer look at each part of it!
The serverless.yml is the core configuration for any Serverless Framework service. In this case, we’re going to use it to configure all the API Endpoints, backing Lambda functions, the authorizer for the protected API endpoint and the DynamoDB table used by the application. My Serverless Learn courses here would also take you through the process of configuring a custom domain for the frontend and teaching you how to deploy it.
So let’s take a look!
Configuring the Serverless Dashboard
The first few lines configure this service with a Serverless Dashboard account to monitor and debug with.
org: yourorg
app: serverlessjams
service: serverlessjams
If you want to create one you can go to dashboard.serverless.com.* If you decide you don’t want to create the account, that’s fine! Just remove the app and org lines from serverless.yml and keep going.
*Disclaimer - While I’ve been using the Serverless Framework for years, as of the publication of this post I currently work at Serverless Inc. (the folks who make the Serverless Dashboard).
Configuring the version and provider Details
Next, I’ve just made sure to specify a framework version in case you’re trying to use a version which might not ve supported:
frameworkVersion: ">=1.61.2 <2.0.0"
After that, I have the provider section. In this I specify that I’m working with AWS, using Python as my function runtime and tell the service which region I’ll be deploying into.
provider:
  name: aws
  runtime: python3.7
  region: us-east-1
  environment:
    DYNAMODB_TABLE: serverlessjams-voteCounts
    AUTH0_DOMAIN: EXAMPLE_REPLACE_ME.auth0.com
    AUTH0_API_ID: EXAMPLE_REPLACE_ME
  iamRoleStatements:
    - Effect: Allow
      Action:
        - dynamodb:Scan
        - dynamodb:PutItem
        - dynamodb:UpdateItem
      Resource: "arn:aws:dynamodb:${opt:region, self:provider.region}:*:table/${self:provider.environment.DYNAMODB_TABLE}"
You’ll also notice the environment section above has a few different values we need to replace. The AUTH0_DOMAIN and AUTH0_API_ID will be used by our backend in order to process the token coming in from the user’s API calls so we need to include the same domain and API Identifier we used earlier:
  environment:
    DYNAMODB_TABLE: serverlessjams-voteCounts
    AUTH0_DOMAIN: dev-5xmirf9t.auth0.com
    AUTH0_API_ID: serverlessjams-vote-api
Make sure to save after you update that!
Then, there is the iamRoleStatements section. In this section we are giving permission to our service to take action on a DynamoDB table that we’re going to create further down in the Resources section of serverless.yml. I’ll cover how to create the table in that section toward the end of this post.
  iamRoleStatements:
    - Effect: Allow
      Action:
        - dynamodb:Scan
        - dynamodb:PutItem
        - dynamodb:UpdateItem
      Resource: "arn:aws:dynamodb:${opt:region, self:provider.region}:*:table/${self:provider.environment.DYNAMODB_TABLE}"
This will give the service permissions to run the Scan, UpdateItem and PutItem operations on the serverlessjams-voteCounts table that we’ll be creating. The syntax after the Resource in the IAM statement is to grab the right region and table name.
Configuring Functions and API Endpoints
Next up, we have to setup all the configuration so the Serverless Framework knows how to setup our API Endpoints:
functions:
  auth:
    handler: backend/auth.handler
  recordSongVote:
    handler: backend/record_song_vote.handler
    events:
      - http:
          path: song/vote
          method: post
          authorizer:
            name: auth
          cors: true
  getSongVoteCounts:
    handler: backend/get_song_vote_counts.handler
    events:
      - http:
          path: votes
          method: get
          cors: true
There are three separate functions above that we’re creating.
- A Lambda Authorizer function called
auththat will sit in front of the protected API Endpoint - A Lambda Function called
recordSongVotethat will vote on songs- This function is configured with an
authorizer- theauthfunction - It also creates a POST API endpoint with the path of
song/vote
- This function is configured with an
- A Lambda Function called
getSongVoteCountsthat will fetch the votes for all songs- This function hasa GET API endpoint with a path of
votes - This function does not have the
authorizerconfiguration because we want even non-users to be able to see vote counts
- This function hasa GET API endpoint with a path of
Let’s look at each in more detail.
Looking at the auth Function
The purpose of the auth function is to generate either an allow or deny policy depending on if the incoming request has a valid token and has verified their email address. First, it loads up dependencies:
# in auth.py
import os
import requests

from get_token import get_token
from verify_token import verify_token

AUTH0_DOMAIN = os.environ.get("AUTH0_DOMAIN")
Then, it defines a handler function that receives the incoming event from any API request that it is configured for.
# ... continued in auth.py
def handler(event, context):
    print(event)
    print(context)
    token = get_token(event)
    id_token = verify_token(token)
    print(id_token)
    userinfo = requests.get(
        'https://' + AUTH0_DOMAIN + '/userinfo',
        headers={"Authorization": "Bearer " + token}
    ).json()
    if id_token and userinfo['email_verified']:
        policy = generate_policy(
            id_token['sub'],
            'Allow',
            event['methodArn']
        )
        return policy
    else:
        policy = generate_policy(
            id_token['sub'],
            "Deny",
            event['methodArn']
        )
        return policy
The get_token function is used to get the unverified token from the incoming header and confirm that it matches the expected format. Essentially, it makes sure that the value coming in looks something like this:
Bearer eyJhbGciOiJSUzI1NiIsInR5cCI6IkpXVCIsImtpZCI6Ik5VWkVOalJGT0VFeE9EVkdNRFJEUTBSQk5UUTNNalUwUTBNeVJETXdOVGhCTmpJek9UTkdPQSJ9.eyJpc3MiOiJodHRwczovL2Rldi01eG1pcmY5dC5hdXRoMC5jb20vIiwic3ViIjoiZ29vZ2xlLW9hdXRoMnwxMTgzMjI2Mzk5MjQxODU1MDA2MjciLCJhdWQiOlsic2VydmVybGVzc2phbXMtdm90ZS1hcGkiLCJodHRwczovL2Rldi01eG1pcmY5dC5hdXRoMC5jb20vdXNlcmluZm8iXSwiaWF0IjoxNTc4ODY3ODA2LCJleHAiOjE1Nzg5NTQyMDYsImF6cCI6IlNJM2dUTmFnajBRVmp6QlZRaHdVaE9MU3pRQjAxYjVFIiwic2NvcGUiOiJvcGVuaWQgcHJvZmlsZSBlbWFpbCJ9.UWF3XyeFbh05H1TWp5BRaZeA-pFt1a7uLdpf6mkixqucOM0Z_B-WtJTK2lgw_mdh1j6CDlnEWhBtOfdcF2_92z-DZRu5apkQjsPA-sbnWJbcL1YVGRZduuE4KuuNhUgQTce42IDiGRfEm-Wqqpfn5-EWp0nN0Mgl1WENCDNmy35iM0CHouhpfDR4f7VYI3yQJCnlJT3MEbCoZoKE89QY2yHzJL7BbvX2FbFEWIBMAwU9D0-m2hi2dkBO9rnGEVY0jF5vRv77qB2KjSbUzLtVAPGhiX11ZheRomqdrM_aWq7aVqD6_m5OLSfrVB-XTkuAC3n7aS6jg10_HhRUJXozCw
If the format is wrong it logs and error and raises an error saying the request is Unauthorized: raise Exception('Unauthorized').
If the token has the correct format then the verify_token attempts to verify it. This is pretty critical, so in a moment we’ll look at that in depth. It basically means we know the token is authentic and not created by a malicious attacker.
With the verified token we then use the token to check the userinfo endpoint Auth0 provides. This gets us basic information about the user including things like name, user id, and email verification status. In this particular case, we decide to say that if the user has a verified email then we should allow use of the API. This means we need to generate an IAM policy with generate_policy that is returned by the auth function to determine if we pass the request along to the API endpoint or not.
Here’s what’s in generate_policy inside of the auth.py:
# ... continued in auth.py
def generate_policy(principal_id, effect, resource, scopes=None):
    policy = {
        'principalId': principal_id,
        'policyDocument': {
            'Version': '2012-10-17',
            'Statement': [
                {
                    "Action": "execute-api:Invoke",
                    "Effect": effect,
                    "Resource": resource
                }
            ]
        }
    }
    if scopes:
        policy['context'] = {'scopes': scopes}
    return policy
In generate_policy above we’re really just creating an AWS IAM policy that says the caller of the API can access the API they requested. Or, if they don’t have a verified email, we’re saying they cannot access the API. There is also a section in this function for scopes that we could pass along to the API to determine the authorization part for itself but that’s covered in my Serverless Learn course.
So this is how we determine both the authentication (with verify_token) and authorization (by checking if the email is valid in this case) of if the user is passed on to the API endpoint. We skimmed over the authentication though, so let’s take a closer look.
Looking at verify_token - How does token verification happen?
All the code to verify our JWTs happens in verify_token.py. The file starts by grabbing a few dependencies and setting up environment variables we saved in serverless.yml.
# in verify_token.py
import os
import json

from six.moves.urllib.request import urlopen
from jose import jwt

AUTH0_DOMAIN = os.environ.get("AUTH0_DOMAIN")
AUTH0_API_ID = os.environ.get("AUTH0_API_ID")
The most important thing to note here is the jose library and jwt. This comes from a python-jose dependency in requirements.txt. This dependency will handle all of the cryptographic verification of the JWT that is coming in to the authorizer. Essentially, you provide it with a few of the configuration values like the Auth0 domain, API ID, the algorithm used and the public key used to encrypt everything, and it will decode and verify the JWT. Here’s how:
# ... continued in verify_token.py

def verify_token(token):
    # This grabs the public key information and metadata
    jsonurl = urlopen("https://"+AUTH0_DOMAIN+"/.well-known/jwks.json")
    jwks = json.loads(jsonurl.read())
    # This will get the unverified token header to compare against
    unverified_header = jwt.get_unverified_header(token)
    rsa_key = {}
    for key in jwks["keys"]:
        # Here we compare the public metadata and unverified header
        if key["kid"] == unverified_header["kid"]:
            rsa_key = {
                "kty": key["kty"],
                "kid": key["kid"],
                "use": key["use"],
                "n": key["n"],
                "e": key["e"]
            }
    if rsa_key:
        try:  # `decode` is where we do the actual verification
            payload = jwt.decode(
                token,
                rsa_key,
                algorithms=["RS256"],
                audience=AUTH0_API_ID,
                issuer="https://"+AUTH0_DOMAIN+"/"
            )
            print("token validated successfully")
            return payload
        except jwt.ExpiredSignatureError:
            print("Token is expired")
            raise Exception('Unauthorized')
        except jwt.JWTClaimsError:
            print("Token has invalid claims")
            raise Exception('Unauthorized')
        except Exception:
            print("Unable to parse token")
            raise Exception('Unauthorized')
As you can see above, we construct a URL like this: https://"+AUTH0_DOMAIN+"/.well-known/jwks.json to fetch the public key information and metadata for our Auth0 tenant. Then we confirm that in the unverified header we’re looking at the same key id as the public key we just grabbed.
After that, the jwt.decode() is doing the heavy lifting for us. We just provide it with the token and the configuration values and it will cryptographically verify the token for us. If successful, it returns the decoded token with the relevant information for us to process and use it wherever we call verify_token (in this case, back in auth.py). If it fails, we have logic to raise several different possible errors after we print a little more detail about them to the logs for review.
So now we know that our API calls are cryptographically verified and protected from any unverified users! So what are we even trying to protect in this case? Let’s take a look!
Looking at the recordSongVote Function
If you take a look at record_song_vote.py we’re really doing a pretty simple interaction with a DynamoDB table. Essentially, we increment on a votes attribute for an item with a key of songName. So every time our API endpoint is hit, we add one vote to the song’s counter. We also return the latest vote counts for that song so the frontend can update it in sync with any recently recorded votes. How does this work? Well, we start with dependencies as always:
import boto3
import os
import json

dynamodb = boto3.client('dynamodb')
And setup a DynamoDB client called dynamodb. Then, we create our handler and expect the songName in the JSON event body:
def handler(event, context):
    song_name = json.loads(event['body'])['songName']
From there, we create result to store the result of the DynamoDB update_item operation. Inside of that operation we load the DYNAMODB_TABLE name from the environment variables setup by serverless.yml’s environment section. And we find the key using the song name. Then we update the item with an UpdateExpression that tells the client to add 1 to the value of the votes attribute.
    # Still in the handler()
    result = dynamodb.update_item(
        TableName=os.environ['DYNAMODB_TABLE'],
        Key={
            'songName':{'S': song_name}
        },
        UpdateExpression='ADD votes :inc',
        ExpressionAttributeValues={
            ':inc': {'N': '1'}
        },
        ReturnValues="UPDATED_NEW"
    )
From there, we create a response to send back to API Gateway that includes CORS information and a status code and we reformat the result body into this: {"votes": "4"}.
    # Still in the handler()
    response = {
        "statusCode": 200,
        "headers": {"Access-Control-Allow-Origin": "*"},
        "body": json.dumps({"votes": result["Attributes"]["votes"]["N"]})
    }
    return response
And that’s it! With this going back via API Gateway, we complete a fully authenticated and authorized request-response cycle.
Looking at the getSongVoteCounts Function
Now we don’t always have to use the authorizer we created. In fact, for getting the song vote counts we don’t want to! We want anyone to be able to load the most recent vote tallies without logging in. So the getSongVoteCounts function doesn’t include the authorizer configuration in serverless.yml.
All it does, it go get all the songs in the table and return the song counts for each of them. In doing so, it uses the DynamoDB scan() operation in get_song_vote_counts.py. Be aware that this wouldn’t be an optimal way to get back data from a DynamoDB table with more than a few items. I’m not going to cover this one in much detail but feel free to take a look at it yourself!
Adding our DynamoDB Table Resource
Now at this stage I still haven’t explained where the heck our DynamoDB table came from! It is defined in serverless.yml in our Resources section:
resources:
  Resources:
    songsTable:
      Type: AWS::DynamoDB::Table
      Properties:
        TableName: ${self:provider.environment.DYNAMODB_TABLE}
        AttributeDefinitions:
          - AttributeName: songName
            AttributeType: S
        KeySchema:
          - AttributeName: songName
            KeyType: HASH
        ProvisionedThroughput:
          ReadCapacityUnits: 1
          WriteCapacityUnits: 1
Essentially, we’re defining all the characteristics of the table we want using CloudFormation syntax:
- The CloudFormation resource name is
songsTable. - We specify that the resource type is an
AWS::DynamoDB::Table - The
TableNamewe want for the table is loaded from the DYNAMODB_TABLE environment variable created in the environment section above inserverless.yml- e.g.serverlessjams-voteCounts - We specify the important attributes for our table:
songNameattribute as a string - Then we specify that
songNameshould be our partition orHASHkey for the table in theKeySchema - Finally, I’m cheap so I also specify a
ProvisionedThroughputof 1 for read and write capacity to make sure that our table has very limited capacity and thus costs as little as possible.
Plugins and Packaging
Ok, now the last steps before we run serverless deploy! Because we’re working with Python, I’ve included a plugin called serverless-python-requirements inside of serverless.yml and inside package.json. To install it you can run npm install.
If you look at serverless.yml, there is a bit of extra configuration for the plugin:
# Below the `resources` section in serverless.yml
plugins:
  - serverless-python-requirements

custom:
  pythonRequirements:
    dockerizePip: non-linux
The plugins section specifies that we’re working with this plugin. Then, the custom section provides configuration for that plugin. Specifically, I’m using Docker locally to build and package up all my Python dependencies. This can help you avoid issues where building Python dependencies on one operating system might not allow them to work inside of AWS Lambda’s runtime. You do need to install Docker on your machine in order to use this functionality.
You can also set dockerizePip: false to avoid having to do this.
With these configuration options set, just also note that I’ve included a package section of config at the bottom of serverless.yml that will exclude certain directories from being bundled in with your Lambda functions:
package:
  exclude:
    - node_modules/**
    - frontend/**
    - package-lock.json
In this case, node_modules doesn’t need to be brought along with your code because you don’t need it for Python functions.
Actually Deploying Your Backend!
Now you’re ready! If you’ve integrated with the Serverless Dashboard using the app and org values in your serverless.yml file, just make sure you’re signed into the dashboard in your default browser and have already run serverless login to setup the connection between your CLI and the dashboard. Also, make sure you have an existing app in your account with the name you’re using (serverlessjams is what I included for you).
After that, or if you opted not to integrate the dashboard, you can start your deployment with serverless deploy! Make sure you’re in the same directory as the serverless.yml file when doing this.
You should see a series of steps for the deployment roll by, if you’re using the Serverless Dashboard you might see something like this included:
Serverless: Safeguards Results:

   Summary --------------------------------------------------

   passed - framework-version
   passed - allowed-runtimes
   passed - no-unsafe-wildcard-iam-permissions
   warned - require-cfn-role
   passed - allowed-stages
   passed - allowed-regions
   passed - no-secret-env-vars

   Details --------------------------------------------------

   1) Warned - no cfnRole set
      details: http://slss.io/sg-require-cfn-role
      Require the cfnRole option, which specifies a particular role for CloudFormation to assume while deploying.


Serverless: Safeguards Summary: 6 passed, 1 warnings, 0 errors
Essentially, these Safeguards are deployment-time checks that evaluate things like security best-practices and organizational standards. They can be set to Warn (as shown above) where if they fail they’ll notify you of something you may want to address. Or to Error, in which case if they fail they’ll block the deployment for you. You can configure them for free with the Serverless Dashboard.
Then, after the Safeguards complete and the CloudFormation stack finishes creating, you can get the information about your service from the Service Information results:
Serverless: Stack update finished...
Service Information
service: serverlessjams
stage: dev
region: us-east-1
stack: serverlessjams-dev
resources: 35
api keys:
  None
endpoints:
  POST - https://examplei4l.execute-api.us-east-1.amazonaws.com/dev/song/vote
  GET - https://examplei4l.execute-api.us-east-1.amazonaws.com/dev/votes
functions:
  auth: serverlessjams-dev-auth
  recordSongVote: serverlessjams-dev-recordSongVote
  getSongVoteCounts: serverlessjams-dev-getSongVoteCounts
layers:
  None
Serverless: Publishing service to the Serverless Dashboard...
Serverless: Successfully published your service to the Serverless Dashboard: https://dashboard.serverless.com/tenants/fernandomcsea/applications/serverlessjams/services/serverlessjams/stage/dev/region/us-east-1
Specifically, you’ll want to copy the endpoints you see in order to include them inside our frontend code!
Updating Our Frontend and Bringing it Together
Inside of the frontend folder go to the js folder open app.js. Inside of there, replace the following variables that appear in the first few lines:
var vote_endpoint = "https://EXAMPLE_REPLACE_ME.execute-api.us-east-1.amazonaws.com/dev/song/vote"
var get_votes_endpoint = "https://EXAMPLE_REPLACE_ME.execute-api.us-east-1.amazonaws.com/dev/votes"
You’ll use the POST endpoint you got from the service information for the vote_endpoint and the GET endpoint for the get_votes_endpoint. The easiest way to do this is just to replace EXAMPLE_REPLACE_ME with whatever the API identifer is for your API. In the example I used above this was examplei4l but yours will be some gibberish letters and numbers without the word example in it.
When you’re done, save and close the app.js file. Now, your frontend should be completely configured to work with your backend! You should be able to spin up your frontend now to test the full suite of functionality. I’ll do this from the frontend directory with python3 -m http.server but you can also use any local server you prefer, just remember to use the same port that you defined in the earlier steps around Auth0 configuration.
You should see your site from earlier almost identically. Except this time, you should be able to login, and actually use the vote button. After you vote, you should be able to see those votes reflected in the UI and if you refresh the page those vote counters should keep the vote count for you!
What Next?
Congrats! You should have just deployed a Serverless Framework service that leverages Lambda Authorizers and Auth0! Not a small undertaking at all.
If you want to hear when I publish more guides like this, please sign up for my mailing list! Have ideas for the next guide I should write? Get in touch with me on Twitter or leave a comment below!
If you haven’t already, you can also check out the Serverless Dashboard where you can get an account to monitor up to 1 million Lambda invocations for free. I used this myself when making this demo to figure out why the heck my deployments were failing:
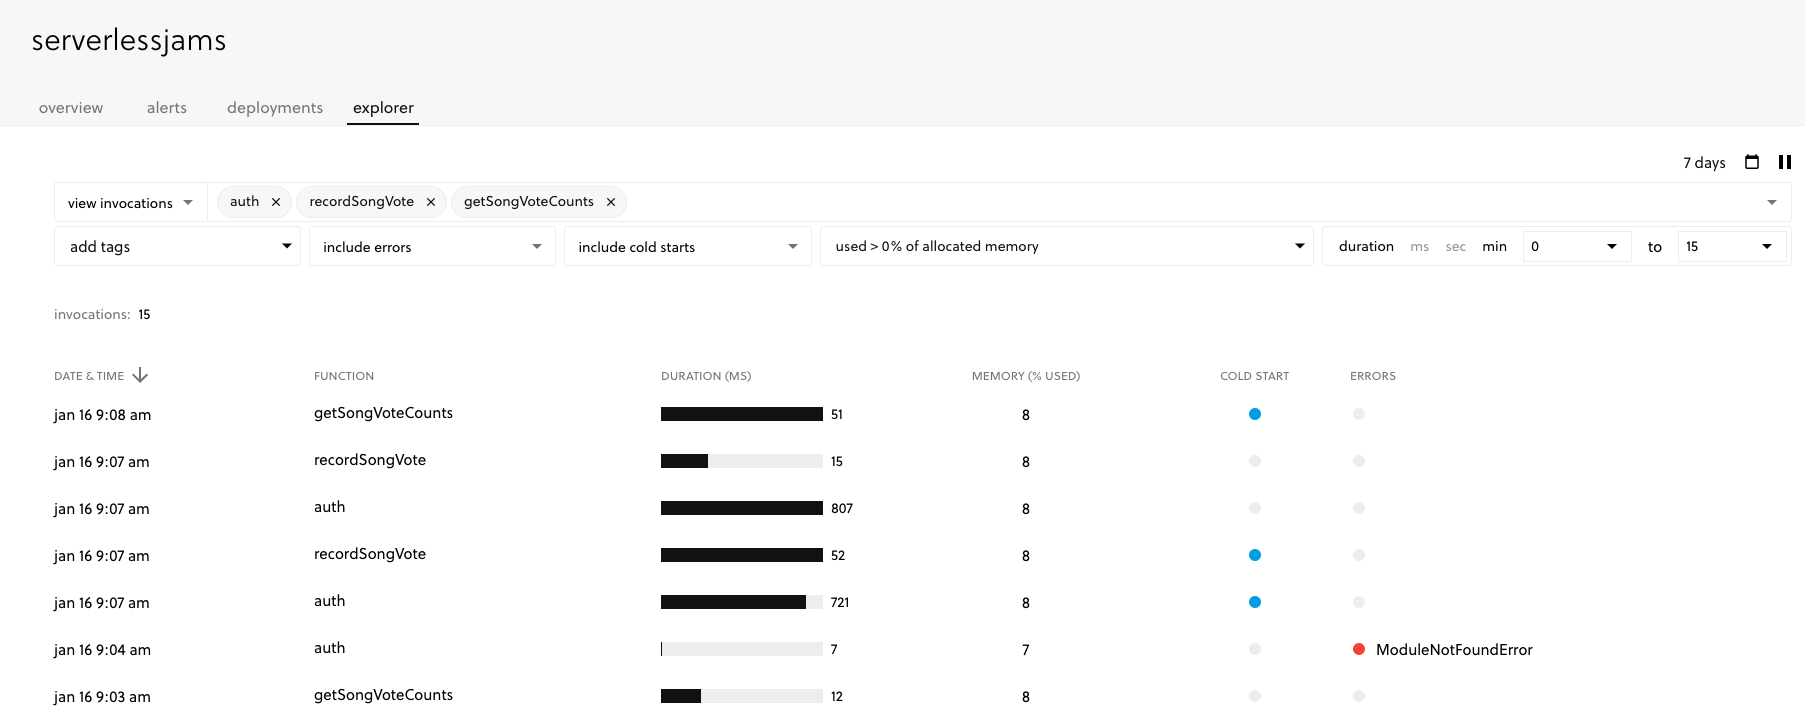
See that red dot next to the ModuleNotFound error? Doh!
That was me forgetting I needed to include requests in the requirements.txt file after I updated this tutorial to use it:

Full disclosure - as of writing this post I work for Serverless Inc. (the makers of the Serverless Framework and the Serverless Dashboard shown in the UI). But I also love using it to debug, deploy and organize my projects so I feel pretty good about recommending it here.
If you want more information about this process, or feel like a video series could help you, check out my free Serverless Learn course. You’ll go through this entire process from step 1 building the backend part by part to a few steps beyond what we did here by adding scopes and scope checking to the backend.