
It’s day 2 of my Twenty Projects in Twenty Days series! Let’s look at how we can create a simple API using Python, the Flask Microframework, Amazon Web Services, and the Serverless Framework. This API will help us to manage three different entities:
- Customers
- Surveys
- Responses (to the surveys)
We’ll be storing all this data inside of an Amazon DynamoDB table, making the API endpoints accessible with the Amazon API Gateway, and using AWS Lambda to interact with the DynamoDB table and manage our entities.
Prerequisites
First, we’ll need to make sure we’ve got the dependencies we need! Make sure you’ve already got these things setup:
- An AWS Account and the AWS CLI setup with your AWS Account credentials.
- The Serverless Framework
- Python 3
- Node.js
- Docker
With all of these installed, you can grab the code from the GitHub repo.
- Run
git clone https://github.com/fernando-mc/flask-based-api.gitto clone the repo.
Inside the repo, you should see something like this:
.
├── app.py
├── entities
│   ├── __init__.py
│   ├── customers.py
│   ├── responses.py
│   └── surveys.py
├── package.json
├── requirements.txt
└── serverless.yml
With the code cloned, let’s review all the parts of this app so we know what’s happening in here!
Reviewing the Code
app.py
First, let’s look at what most folks who have used Flask before might be more familiar with - the app.py file. Inside app.py we import some Flask and the Flask request utility to to make it easier to deal with JSON data in flask.
from flask import Flask
from flask import request
Then, we import the various entities we’ll be using from our entities folder.
from entities import customers
from entities import surveys
from entities import responses
After this, we create the Flask application called app:
app = Flask(__name__)
The rest of the file is us creating various endpoints that allow us to interact with our our entities using HTTP requests to our API. The first one shows us how we could create a customer using the /customer route:
@app.route('/customer', methods=['POST'])
def create_customer():
    payload = request.get_json()
    return customers.create(payload)
Inside of the route, we use the customers entity and the create() method for that entity which we pass the incoming JSON payload from the request.
Our Entities
Next, let’s look at what’s in the entities directory.
├── entities
    ├── __init__.py
    ├── customers.py
    ├── responses.py
    └── surveys.py
The first file in this folder is the __init__.py file. This file is completely empty but it is a special file that allows Python to treat this directory as a Python module - essentially allowing us to import things from inside of customers.py or one of the other Python files. This is why we were able to run from entities import customers in app.py. And it’s why we can use the methods inside those files to interact with our entities.
Let’s keep with our earlier trend and take a look at the customers.py file. Inside there are a few setup steps that allow us to use boto3 (the AWS SDK for Python) to interact with Amazon DynamoDB in order to store and retrieve our data:
import boto3
import json
import os

dynamodb = boto3.resource('dynamodb')
TABLE_NAME = os.environ['DYNAMODB_TABLE']
table = dynamodb.Table(TABLE_NAME)
You’ll notice we’re referencing an environment variable in this above code - we’ll be setting that up later in serverless.yml. But this then allows us to create Python functions for different operations like creating our customer entities:
def create(body):
    customer_id = body['customer_id']
    profile_data = body['profile_data']
    item = {
        'pk': 'CUSTOMER#' + customer_id,
        'sk': 'PROFILE#' + customer_id,
        'profile_data': profile_data
    }
    table.put_item(Item=item)
    return json.dumps(item)
Or getting them back out of the DynamoDB table:
def get(customer_id):
    item = table.get_item(
        Key={
            'pk': 'CUSTOMER#' + customer_id,
            'sk': 'PROFILE#' + customer_id
        }
    )['Item']
    return json.dumps(item)
If you look at the other entities files you’ll see things similar to this that enable the other operations and more complex operations like getting all the responses for a survey or all the surveys for a particular customer. If you’d like to learn some more of the details of using DynamoDB I’d suggest taking a look at the DynamoDB Guide which is a great learning resource for DynamoDB by Alex DeBrie. You can also take my Pluralsight course on Connect DynamoDB to Your Application where I cover a lot of the details. Just sign up for my mailing list and reply to the welcome email and I’ll give you a 30-day free trial!
So now that we know how our Flask application is configured to use our entities to help power the routes it sets up in app.py let’s look at how we’re going to deploy all the infrastructure to run this!
The serverless.yml file
Inside of the serverless.yml file, we’ll be setting up all the configuration required by the Serverless Framework in order to deploy our application using Flask. The first like of the file allows us to name our service with:
service: flask-api
From there, we can configure some details about the environment we’re using in the provider section:
provider:
  name: aws
  runtime: python3.7
  environment:
    DYNAMODB_TABLE: ${self:service}-${opt:stage, self:provider.stage}
  iamRoleStatements:
    - Effect: Allow
      Action:
        - dynamodb:Scan
        - dynamodb:Query
        - dynamodb:PutItem
        - dynamodb:UpdateItem
        - dynamodb:GetItem
      Resource:
        - "arn:aws:dynamodb:${opt:region, self:provider.region}:*:table/${self:provider.environment.DYNAMODB_TABLE}"
        - "arn:aws:dynamodb:${opt:region, self:provider.region}:*:table/${self:provider.environment.DYNAMODB_TABLE}/index/sk-pk-index"
This section is a bit bulkier, but effectively it’s setting us up to deploy the application on AWS using Python 3.7 as the runtime for our code. The environment section is also creating an stage-specific environment variable that will be used for our DynamoDB table name later on. In this case it would evaluate to flask-api-dev for the dev stage of the application.
The iamRoleStatements section is determining what permissions our service should have in AWS to act on our behalf. In this case, it needs a bunch of permissions to access DynamoDB to add items and get items out of DynamoDB. Also, it’s going to need these permissions on the DynamoDB table itself as well as an index of the table called the sk-pk-index that will allow different access patterns than the main table.
Next, up, the serverless.yml has a plugins and custom section that are currently being used to configure some common Serverless Framework plugins for working with Python and tools like Flask:
plugins:
  - serverless-wsgi
  - serverless-python-requirements

custom:
  wsgi:
    app: app.app
    pythonBin: python3
    packRequirements: false
  pythonRequirements:
    dockerizePip: non-linux
This section lets the Serverless Framework know what we’ll be using the the serverless-wsgi plugin to wok with Flask and the serverless-python-requirements plugin to help bundle up Python dependencies. The custom section shows the configuration for these plugins. In the wsgi section the app configuration points to the app.py file and the Flask app inside of that we created. It also has a a pythonBin option that helps select how to develop with the local Python installation when using the WSGI plugin to develop the API locally.
Next, there is the functions section:
functions:
  app:
    handler: wsgi_handler.handler
    events:
      - http: ANY /
      - http: 'ANY {proxy+}'
This allows the Serverless Framework to create a Lambda Function and an API Gateway endpoint to serve up the Flask application publicly.
After that, we have a big resources section:
resources:
  Resources:
    surveysTable:
      Type: AWS::DynamoDB::Table
      Properties:
        TableName: ${self:provider.environment.DYNAMODB_TABLE}
        AttributeDefinitions:
          - AttributeName: pk
            AttributeType: S
          - AttributeName: sk
            AttributeType: S
        KeySchema:
          - AttributeName: pk
            KeyType: HASH
          - AttributeName: sk
            KeyType: RANGE
        ProvisionedThroughput:
          ReadCapacityUnits: 1
          WriteCapacityUnits: 1
        GlobalSecondaryIndexes:
        - IndexName: sk-pk-index
          KeySchema:
          - AttributeName: sk
            KeyType: HASH
          - AttributeName: pk
            KeyType: RANGE
          Projection:
            ProjectionType: ALL
          ProvisionedThroughput:
            ReadCapacityUnits: 1
            WriteCapacityUnits: 1
This section will instruct the Serverless Framework to create our DynamoDB table in AWS along with the index on that table. It’ll also reference the environment variable we setup earlier with ${self:provider.environment.DYNAMODB_TABLE}.
Finally, at the end of the file we just tell the Serverless Framework to nto include some folders in our packaging of the service:
package:
  exclude:
    - node_modules/**
    - venv/**
This can help make sure we’re not bundling up a massive node_modules folder when we don’t need it or inadvertently including a Python virtual environment when we don’t actually want to.
requirements.txt and package.json
Next up, there are a few straggling dependencies files we need to make sure our application will work and be deployed properly. The requirements.txt file just has the Flask dependency in it and will be used by the serverless-python-requirements plugin to install Flask and ship it our with our other application code.
The package.json file will just be used to make it easier for us to install the plugins we use in the next step. So let’s deploy this application!
Deploying Our Application
Because the Serverless Framework should be pulling in credentials from your AWS CLI configuration, you should be able to get started pretty quickly.
First, run npm install in order to get the development dependencies included in package.json ready to be used. The Serverless Framework will use those to help package up Python dependencies like Flask as well as allowing it to integrate with Flask using the Web-Server Gateway Interface (WSGI) Plugin.
Then, run serverless deploy!
After the deployment finishes, you should see an output that looks something like this:
Service Information
service: flask-api
stage: dev
region: us-east-1
stack: flask-api-dev
resources: 13
api keys:
  None
endpoints:
  ANY - https://6qb8uh2igk.execute-api.us-east-1.amazonaws.com/dev
  ANY - https://6qb8uh2igk.execute-api.us-east-1.amazonaws.com/dev/{proxy+}
functions:
  app: flask-api-dev-app
layers:
  None
Your API Endpoints (the part with the 6qb8uh2igk above) will be a different alphanumeric id than mine. Essentially, this endpoint is the general endpoint to interact with your Flask application. The part of the URL after the /dev/ will then return whatever is configured by your Flask application. Let’s test it out!
Testing Our Application
Now that the application is deployed, you can easily test it using something like Postman.
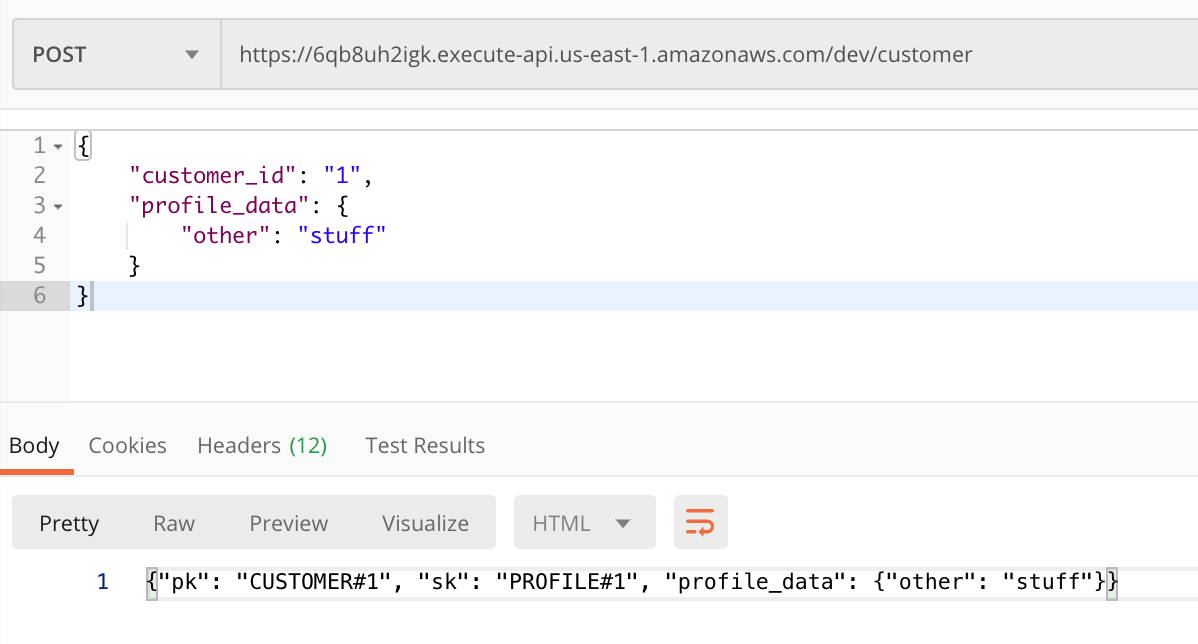
Taking the endpoint to create customers as an example you can POST JSON data in this format to create a customer:
{
	"customer_id": "1",
	"profile_data": {
		"other": "stuff"
	}
}
Here’s an example of this in Postman:
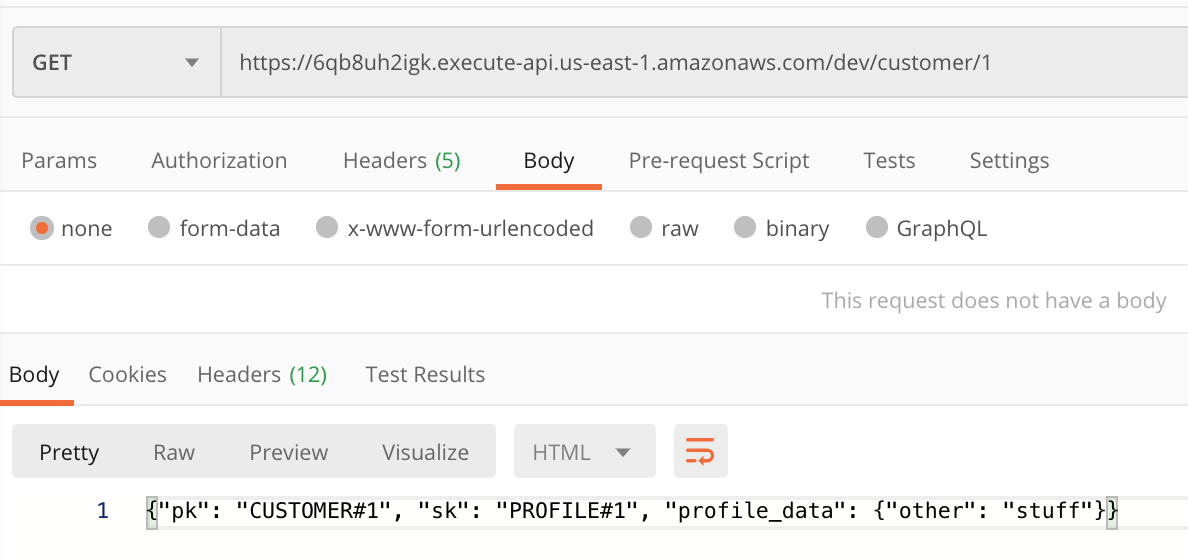
From there, you could also fetch the data back out using a GET request for a specific customer with the customer_id like this: https://6qb8uh2igk.execute-api.us-east-1.amazonaws.com/dev/customer/1
Here’s an example in Postman, but you can also just open your URL up in your browser to make a GET request:
And that’s it! You can test all the other endpoints out and play around with the application!
If you’d like to learn more about Serverless development, just sign up for my mailing list and reply to the first email to ask for access to all my Pluralsight courses for free for 30 days!