
Today is project five in my Twenty Projects in Twenty Days series! Yesterday, I revisited Nandolytics which showed how to create a homemade analytics service. Today, we’re looking at the latest version of my Chameleon Color Scheme API. This idea has been brewing since the first version I made several years ago. To see what we’re building today, check out the live demo for yourself here! Here’s what it looks like:
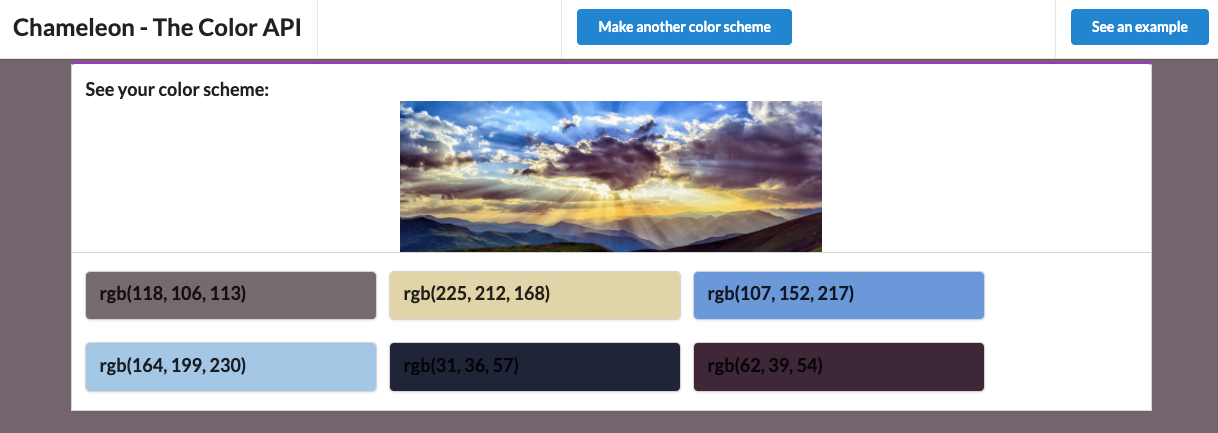
Doing this allows us to use a host of AWS services including Lambda, DynamoDB, API Gateway, S3 and more! Let’s take a look now!
What We’re Building
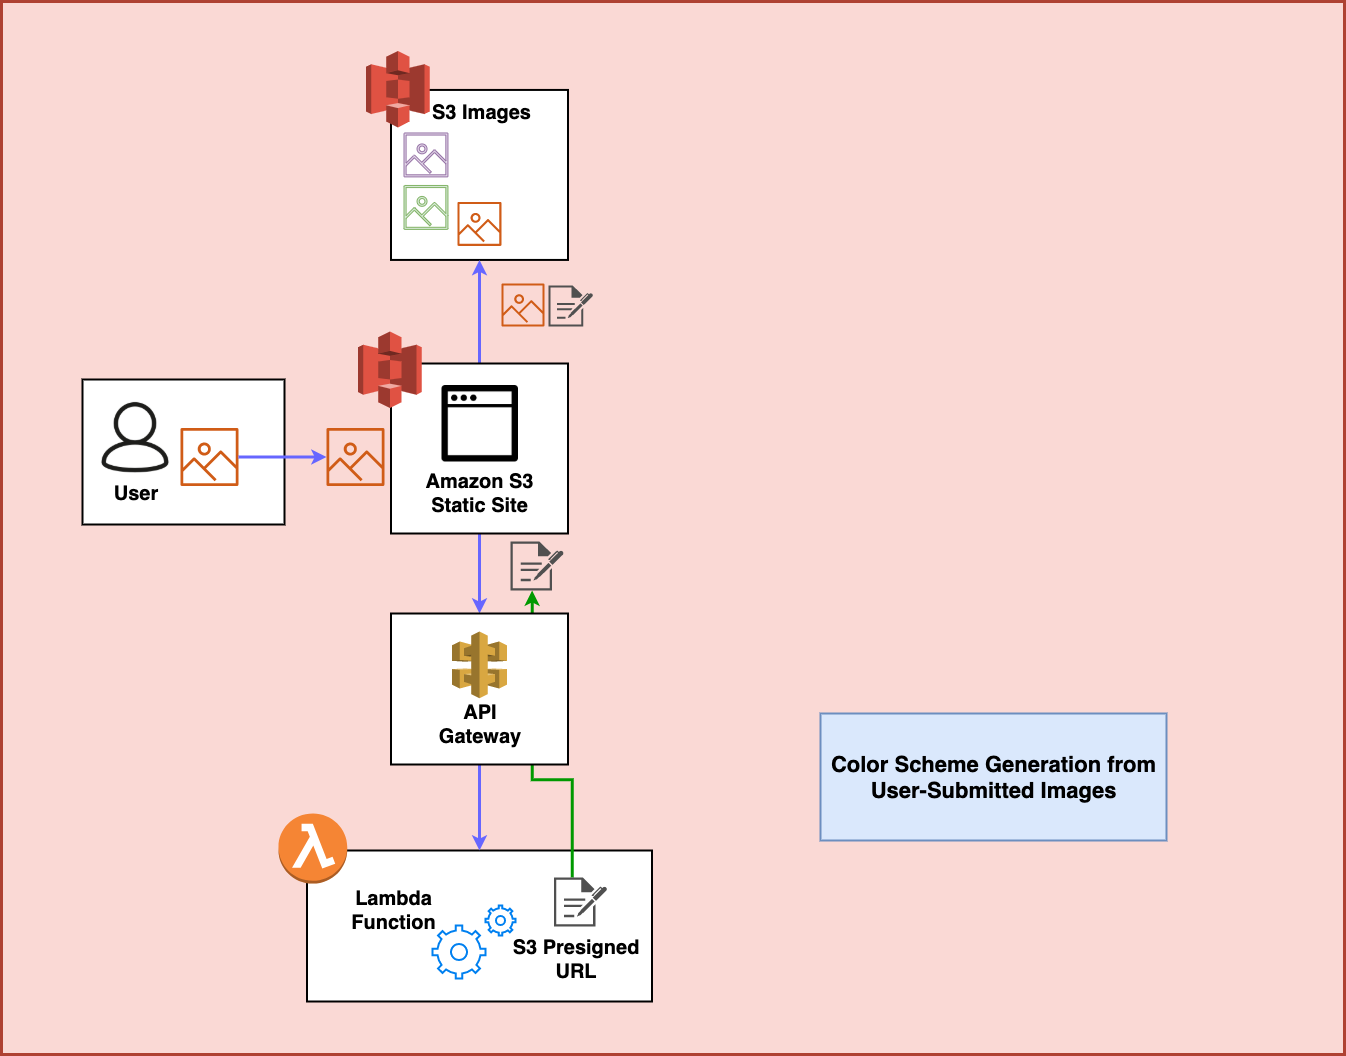
To build this project we rely on a variety of AWS services. Here’s what the architecture looks like:
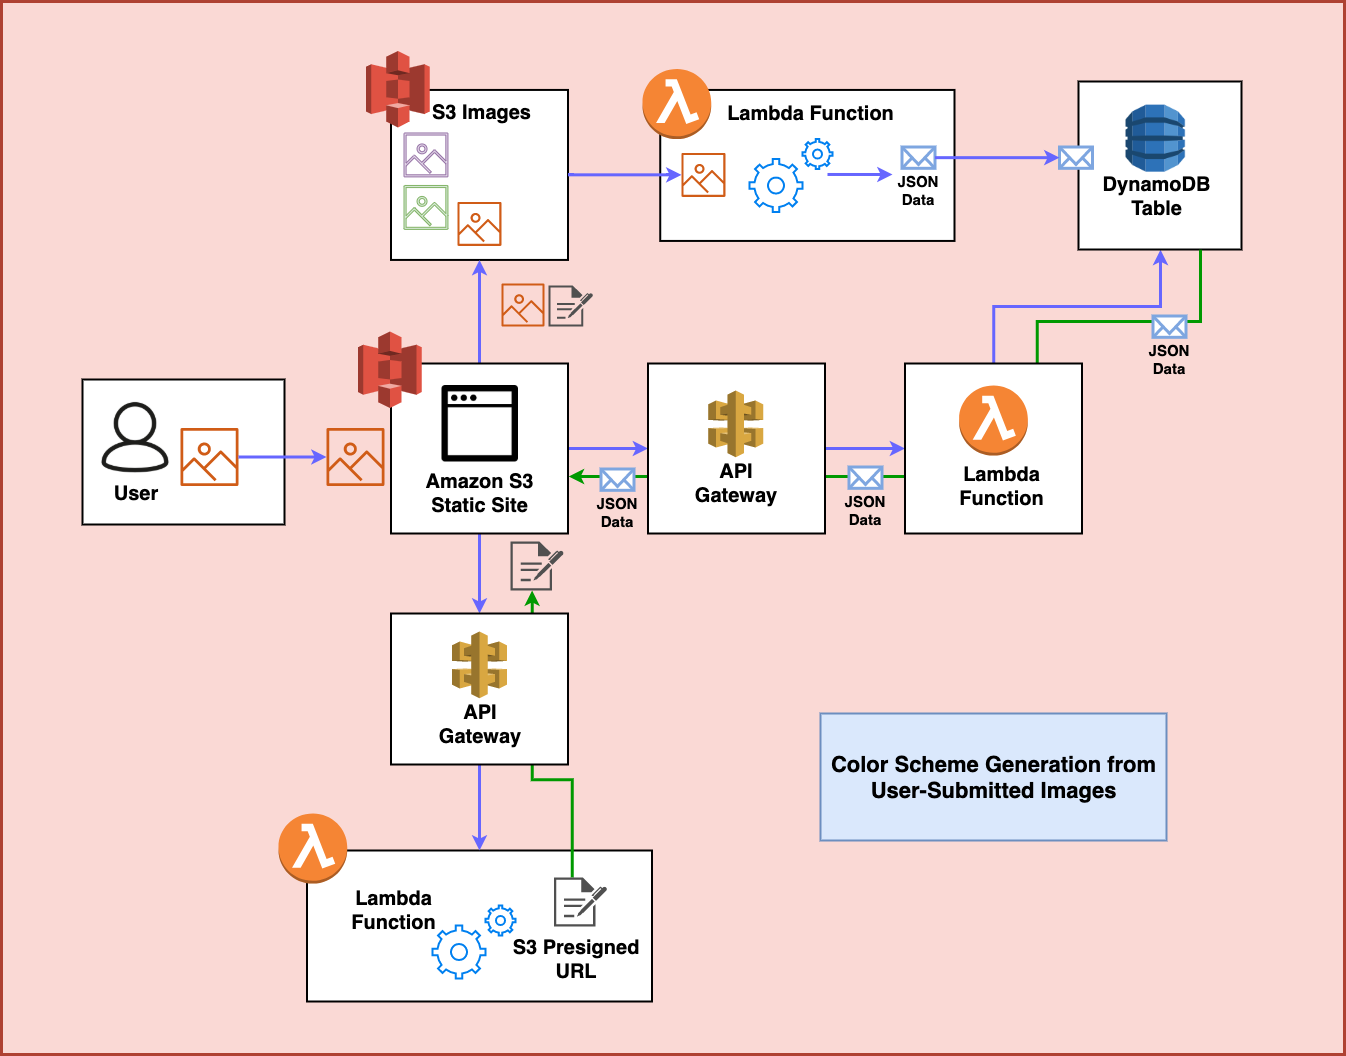
This diagram shows the entire process of user-uploaded images having color schemes generated for them. But let’s look at it step by step first.
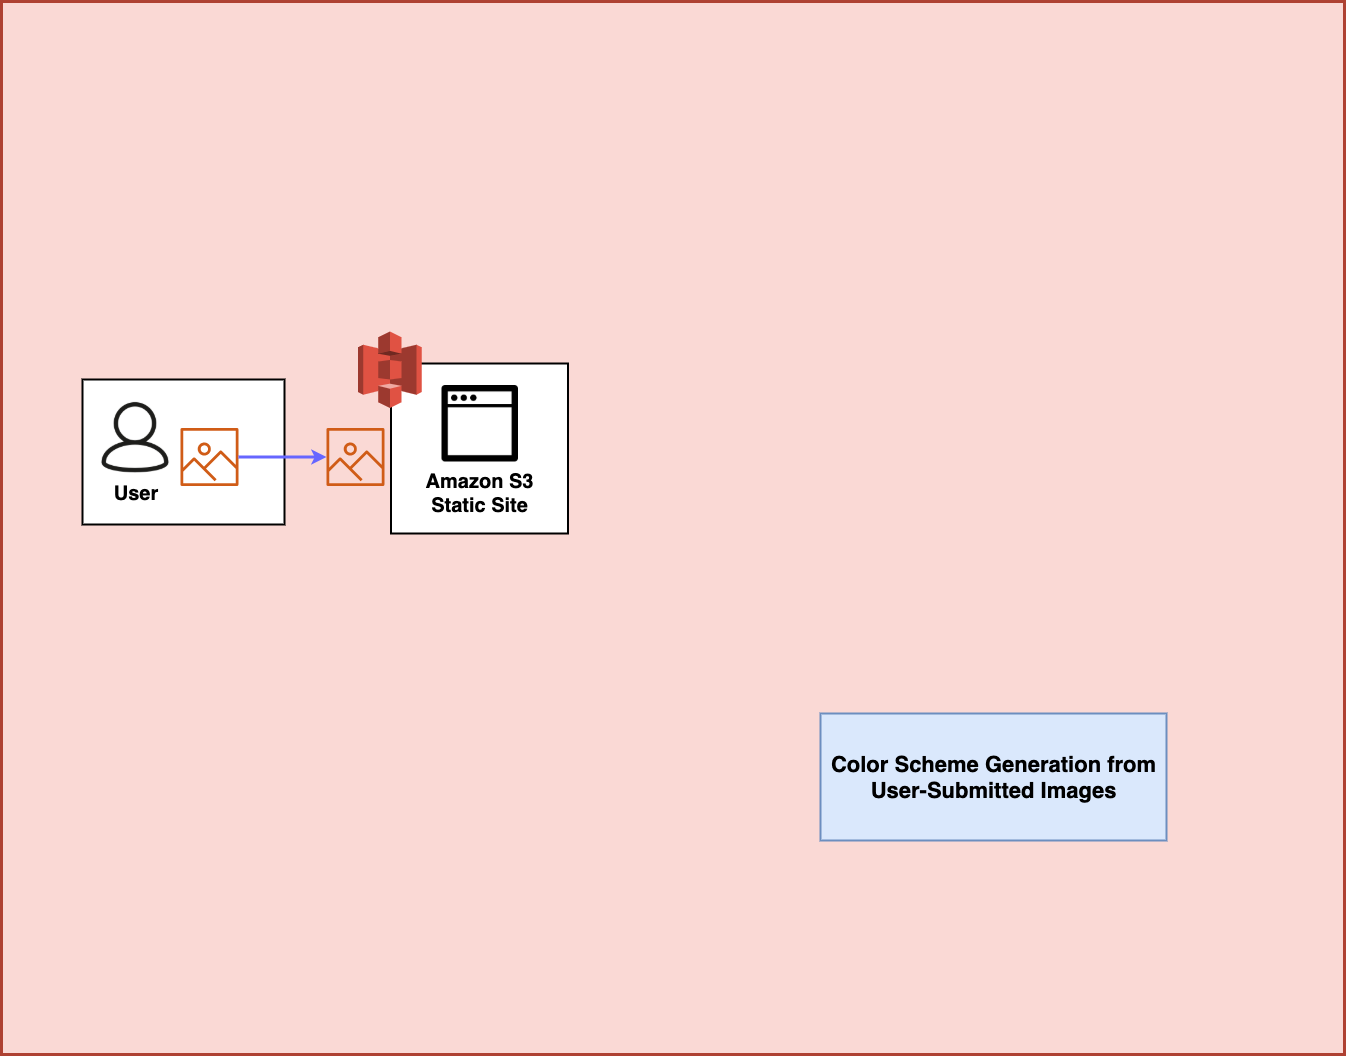
Step 1
First, the user visits a static website hosted in Amazon S3. They use this website to upload an image file:
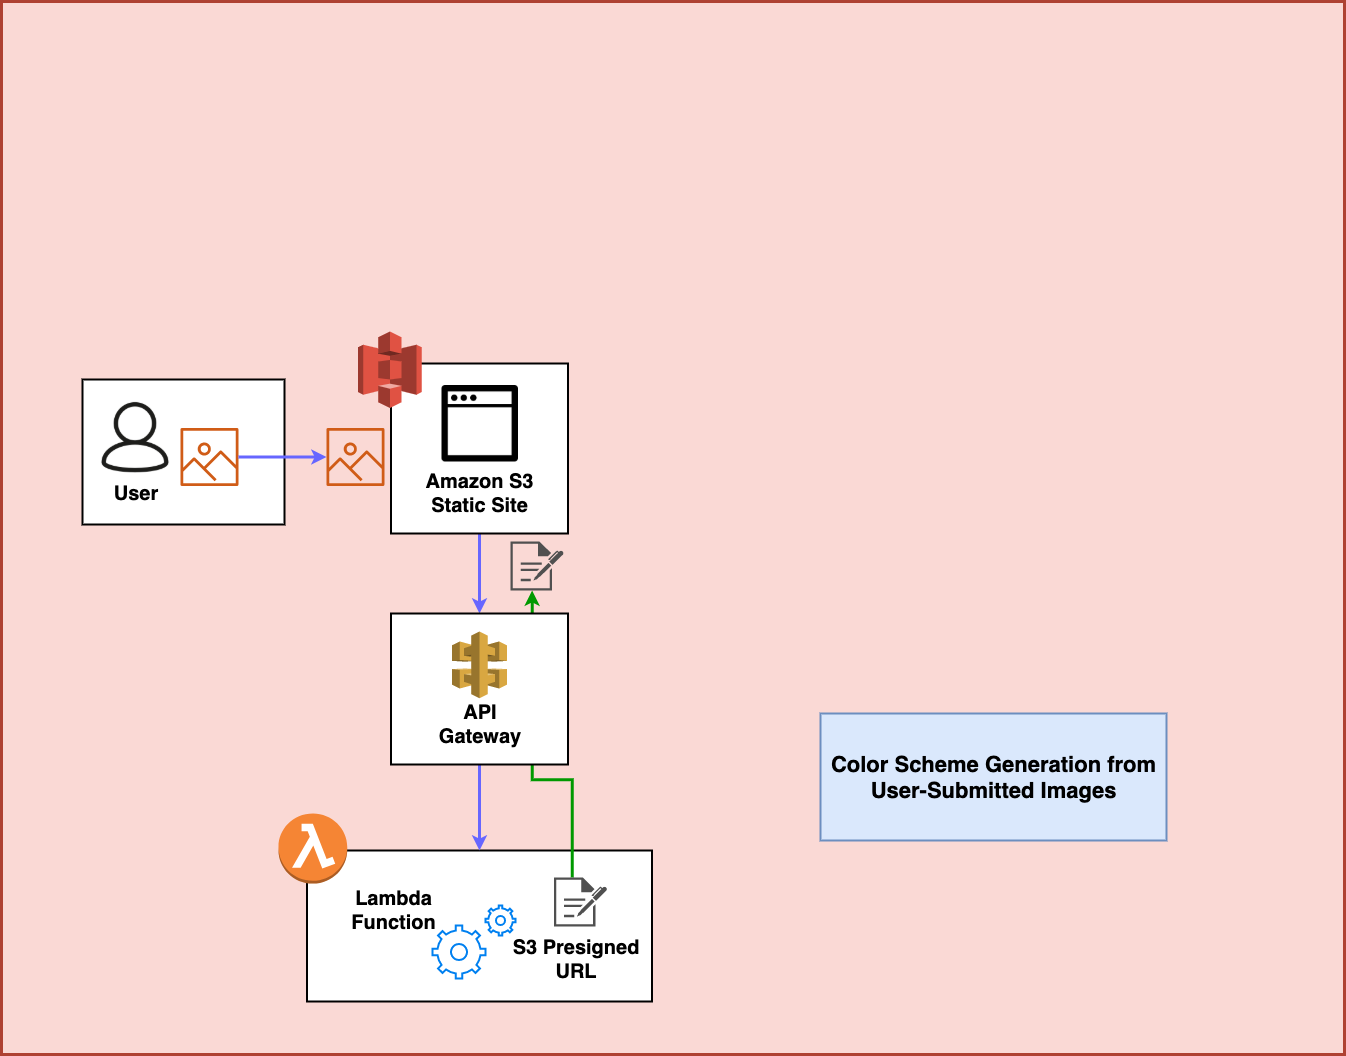
Step 2
Behind the scenes, the website goes out and makes a request against an Amazon API Gateway Endpoint that is connected to an AWS Lambda Function. This function generates an Amazon S3 presigned url which allows uploading an image to S3:
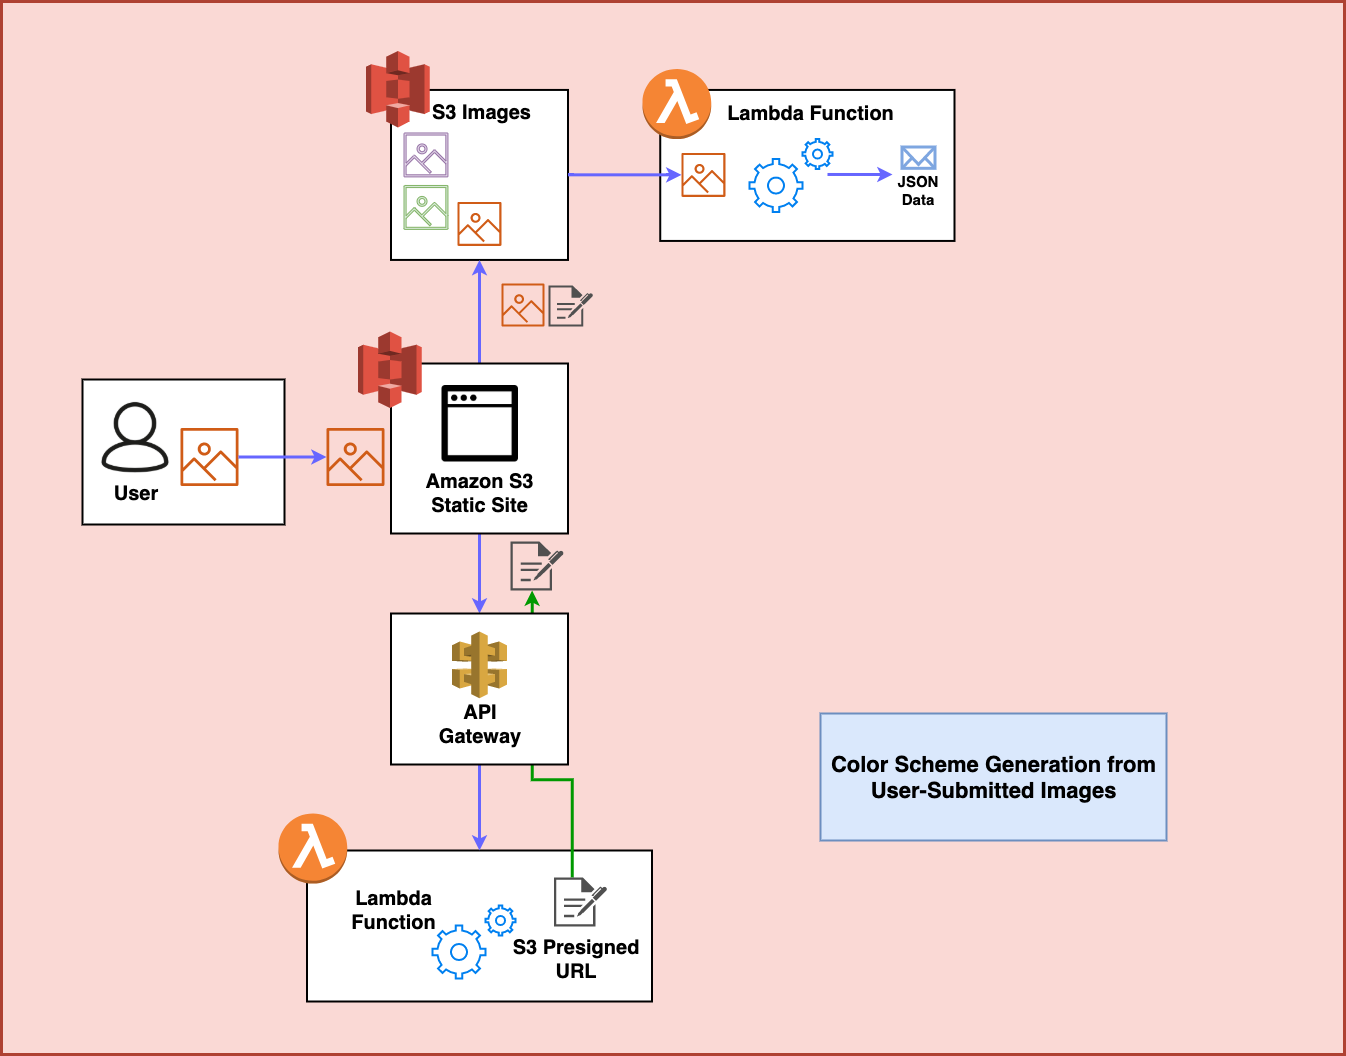
Step 3
From here, the presigned URL is actually used by the frontend to POST the image to S3:
Step 4
After the image is upload to S3, an unrelated Lambda function sits and waits for any incoming images to that S3 bucket in order to process them. In this case, it uses a library called Color Thief to process the image and generate a color scheme for the image that it then turns into JSON:
Step 5
The Lambda Function sends the JSON data over to a DynamoDB table where it can be accessed later:
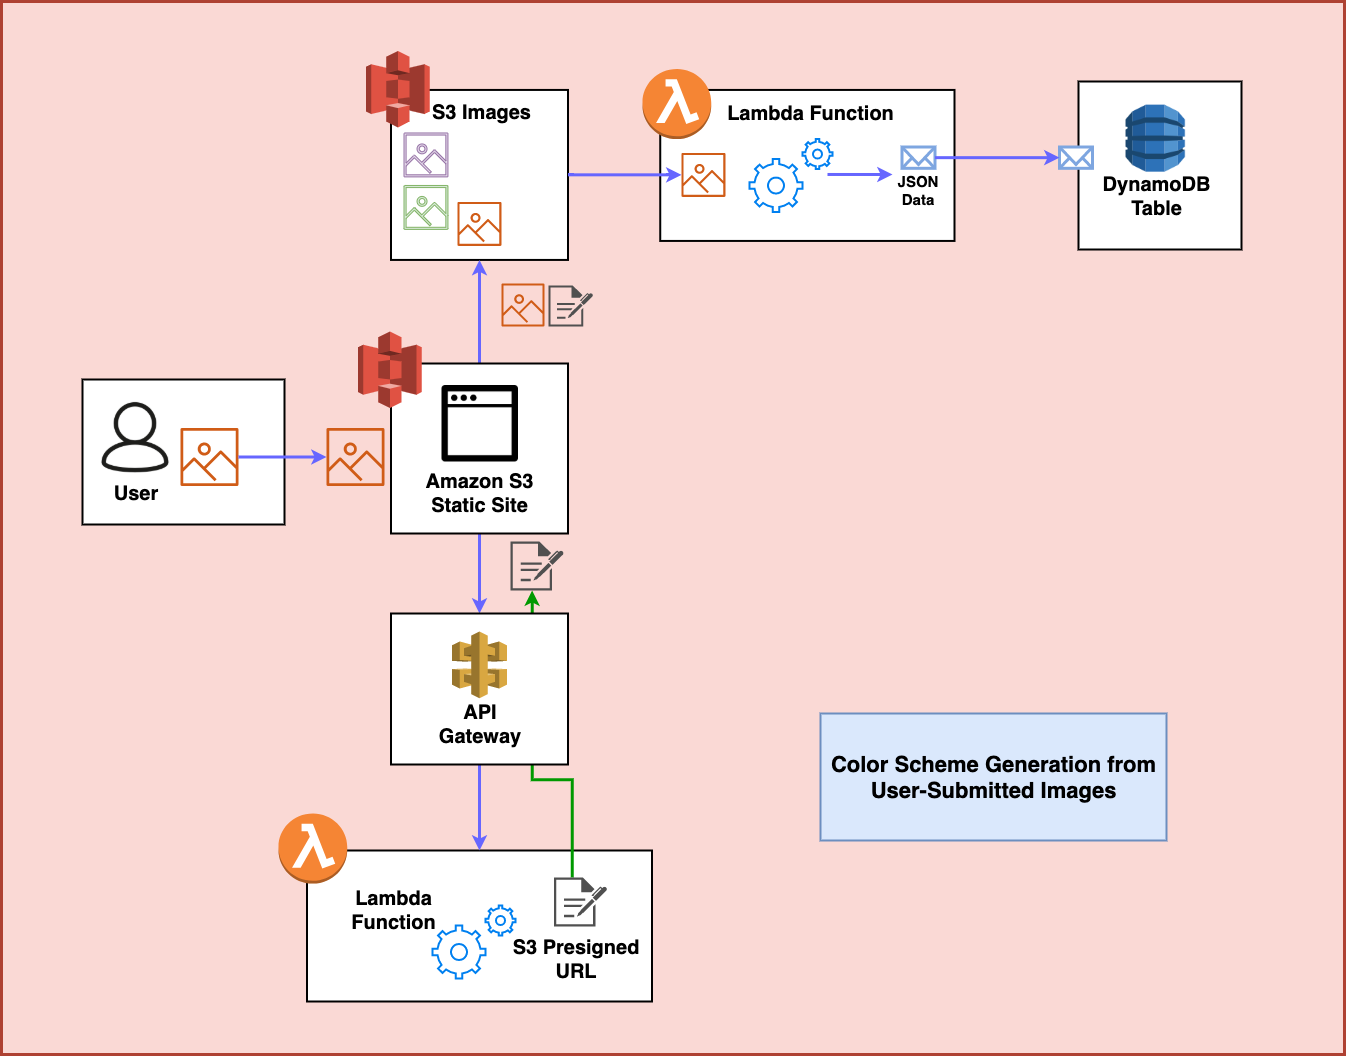
Step 6
Finally, the frontend waits for a few seconds for this process to complete and then makes a request to another API endpoint in order to fetch the color scheme now stored in the DynamoDB table. At this point, it restyles the style attributes on the frontend using this data and the process is complete:
Prerequisites
So what would we need in order to build something like this? In this case, I relied on these dependencies:
- My AWS Account and the AWS CLI with my credentials.
- The Serverless Framework
- Node.js
- Python
With all of these installed, you can grab the code from the git repo here or just run:
git clone https://github.com/fernando-mc/chameleon-v2.git
Once you have the code, it should look something like this:
├── backend
│   ├── __init__.py
│   ├── cleaner.py
│   ├── create.py
│   ├── generate_schemes.py
│   ├── generate_url.py
│   └── get.py
├── frontend
│   └── index.html
├── package-lock.json
├── package.json
├── requirements.txt
└── serverless.yml
So let’s take an abbreviated look at how this all works!
Reviewing Our Code
Our serverless.yml File
Inside serverless.yml, we configure all the cloud architecture and resources for our service using the Serverless Framework.
The start of the file gives the service a name and sets up some details of working with AWS, like the Python runtime our functions will use, an environment variable we can use for the DynamoDB table’s name, and the AWS Identity and Access Management permissions we need for this service to have:
service: chameleon-v2

provider:
  name: aws
  runtime: python3.7
  environment:
    DYNAMODB_TABLE: ${self:service}-${opt:stage, self:provider.stage}
  iamRoleStatements:
    - Effect: Allow
      Action:
        - s3:*
        - dynamodb:Query
        - dynamodb:Scan
        - dynamodb:GetItem
        - dynamodb:PutItem
        - dynamodb:UpdateItem
        - dynamodb:DeleteItem
      Resource:
        - "arn:aws:dynamodb:${opt:region, self:provider.region}:*:table/${self:provider.environment.DYNAMODB_TABLE}"
        - "arn:aws:s3:::chameleon-photos/*"
        - "arn:aws:s3:::chameleon-photos"
        - "arn:aws:s3:::fmc-private-assets/*"
        - "arn:aws:s3:::fmc-private-assets"
In this case, the service gets the permissions it needs to act on DynamoDB and on the S3 buckets that store the images. It also gets access to another bucket that I’m using to store the example images which will be periodically copied back into the main chameleon-photos bucket every night when the project cleans out any old images people have uploaded.
Next, we have a functions section which contains the configuration for each Lambda function this service uses. Let’s look at each of these:
- The
cleanerfunction.
functions:
  cleaner:
    handler: backend/cleaner.handler
    events:
      - schedule: rate(1 day)
This function isn’t included in the diagram above because it’s not a core part of this architecture. Basically, I setup a cleaner function to run once a day to make sure that even if this service gets really popular that all the images are removed from the bucket and the demos images are recreated. This is meant to make sure I don’t end up paying for an S3 bucket with a million images in it later on without realizing it.
- The
generateUrlfunction.
  generateUrl:
    handler: backend/generate_url.handler
    events:
      - http:
          path: generate
          method: get
          cors: true
This function is for creating the pre-signed URL that will be used by the frontend to upload an image to S3. It is triggered by an http event, meaning that there will be an API Gateway endpoint deployed for it.
- The
createfunction.
  create:
    handler: backend/create.create
    timeout: 10
    events:
      - s3:
          bucket: chameleon-photos
          event: s3:ObjectCreated:*
          existing: true
This function actually creates the color scheme for images. It is triggered whenever there is a new image uploaded to the S3 bucket that stores the photos for the project. Then, it processes the image and creates a color scheme which it stores in the DynamoDB table.
- The
getfunction.
  get:
    handler: backend/get.get
    events:
      - http:
          path: colors/{id}
          method: get
          cors: true
The get function creates another HTTP endpoint with the API Gateway that will be used by the frontend to fetch the color scheme from the DynamoDB table.
After that, we create the DynamoDB table in the resources section:
resources:
  Resources:
    usersTable:
      Type: AWS::DynamoDB::Table
      Properties:
        TableName: ${self:provider.environment.DYNAMODB_TABLE}
        AttributeDefinitions:
          - AttributeName: pk
            AttributeType: S
        KeySchema:
          - AttributeName: pk
            KeyType: HASH
        BillingMode: PAY_PER_REQUEST
It’s a pretty boring table with a partition key of pk and no sort key.
Finally, we look at the section that configures the plugins we’re using for the framework:
plugins:
  - serverless-python-requirements
  - serverless-finch

custom:
  client:
    bucketName: chameleon-api
    distributionFolder: frontend
    errorDocument: index.html
  pythonRequirements:
    dockerizePip: non-linux
In this case, we’re using the serverless-finch plugin to deploy our frontend to Amazon S3. We’re then using the serverless-python-requirements to deploy our Python dependencies like Color Thief.
The package.json and requirements.txt Files
In order to use the plugins I just mentioned, I’ve make sure they’re listed in the package.json file as development dependencies. This way, we can run npm install in order to install then before deployment.
The requirementxt.txt file just has our Color Thief dependency and makes sure that gets bundled with our code when serverless-python-requirements gets our dependencies for us.
Frontend Code
I wont cover the frontend code in much detail, basically it’s a simple HTML website using Semantic UI, Dropzone.js and a few other JavaScript libraries.
It operates by making initial requests for a presigned S3 URL then allowing the user to upload an image. As part of the presigned URL there will be a key which is where the image will be stored in S3. The frontend then waits a few seconds and uses the key to make a request to the endpoint that should have color styles available after a few seconds.
The rest is just some JavaScript to make everything update in the right order.
__init__.py
So now let’s look at all the backend code! First, let’s note that in the backend folder there is an empty __init__.py file. This allows the other files in the project to import directly from each other by making the backend folder a Python module.
generate_url.py
This file is what creates the presigned S3 URL. First, there is the code to actually generate the URL:
import boto3
import json
import os
import uuid

s3 = boto3.client('s3')


def generate_presigned_url():
    object_name = str(uuid.uuid4())
    response = s3.generate_presigned_post(
        'chameleon-photos',
        object_name,
        Fields={
            "acl": "public-read",
            "content-length-range": [0, 1000000]
        },
        Conditions=[
            {"acl": "public-read"},
            ["content-length-range", 0, 1000000]
        ],
        ExpiresIn=3600
    )
    response = response["fields"]
    del response["content-length-range"]
    return response
Inside of this, it sets up some required conditions to expect as part of the upload. First, the acl makes sure that the image file will be public and useable by the website to display on the page. Next, the contnt-length-range will make sure the upload is 1MB or smaller. This just makes sure that the S3 bucket doesn’t get hammered with massive images and the Lambda function can still process them.
The next part of this same file is the Lambda handler function to return the data back out through the API Gateway:
def handler(event, context):
    url_details = generate_presigned_url()
    response = {
        "statusCode": 200,
        "headers": {"Access-Control-Allow-Origin": "*"},
        "body": json.dumps(url_details)
    }
    return response
create.py
Next up, we have the code to actually create the color schemes item in the DynamoDB table. The first section of the file just imports some dependencies:
import boto3
import json
import logging
import os
import time

from backend import generate_schemes
from colorthief import ColorThief

generate_color_scheme = generate_schemes.generate_color_scheme

dynamodb = boto3.resource('dynamodb')
table = dynamodb.Table(os.environ['DYNAMODB_TABLE'])
s3 = boto3.resource('s3')
You’ll notice this also includes getting the generate_color_scheme function from the generate_schemes.py file. Then the create function is the handler for the Lambda function and takes the S3 event and finds the object key it needs in order to take an action on that image file.
After it gets that, it downloads the image to Lambda tmp space, runs the generate_color_scheme function on it and then deletes the file from tmp space.
def create(event, context):
    s3_key = event['Records'][0]['s3']['object']['key']
    local_file_name = '/tmp/' + s3_key
    s3.Bucket('chameleon-photos').download_file(s3_key, local_file_name)
    color_scheme = generate_color_scheme(local_file_name)
    # Remove the object from tmp space
    if os.path.exists(local_file_name):
        os.remove(local_file_name)
    item = {
        'pk': s3_key,
        'rgb': color_scheme,
    }
    # Write the color to the database
    table.put_item(Item=item)
    # Create a response
    response = {
        "statusCode": 200,
        "body": json.dumps(item)
    }
    return response
After all this, it then creates an item and puts that item into the DynamoDB table.
generate_schemes.py
As a part of the create.py function it uses the code in generate_schemes.py. This file uses the colorthief library to process an image file and output a JSON object with the color schemes for that object:
import json
from colorthief import ColorThief


def generate_color_scheme(filename):
    # Loop over images and get dominant color and palette for each
    color_thief = ColorThief(filename)
    dominant_color = 'rgb' + str(color_thief.get_color(quality=1))
    palette = color_thief.get_palette(color_count=6)
    # Setup for next loop
    palette_template = ''
    result_template = '"dominant": "{0}", "palette": [{1}]'
    for color in palette:
        palette_template += (json.dumps('rgb' + str(color)) + ', ')
    full_palette = palette_template[:-2]
    result = '{' + result_template.format(dominant_color, full_palette) + '}'
    return result
It ends up creating an object that stores RGB values to style the page later.
get.py
This function is pretty simple. It takes the path parameters in a GET url (the key id that ends up being after the / in the URL in this case) and then makes a request to the DynamoDB table to get the color palette back out:
import boto3
import json
import os

dynamodb = boto3.resource('dynamodb')


def get(event, context):
    table = dynamodb.Table(os.environ['DYNAMODB_TABLE'])
    # Fetch color from the database
    result = table.get_item(
        Key={
            'pk': event['pathParameters']['id']
        }
    )
    # Create a response
    response = {
        "statusCode": 200,
        "headers": {"Access-Control-Allow-Origin": "*"},
        "body": json.dumps(
            result['Item']
        )
    }
    return response
cleaner.py
That’s almost everything! The final file in there is cleaner.py. This file is used exclusively to run a regular daily cleanup job on the S3 bucket to remove uploaded photos so I don’t have to pay for them.
import boto3
s3 = boto3.resource('s3')
bucket = s3.Bucket('chameleon-photos')


def handler(event, context):
    bucket.objects.all().delete()
    for i in range(1,7):
        key_without_folder_prefix = str(i) + '.png'
        copy_source = {
            'Bucket': 'fmc-private-assets',
            'Key': 'chameleon/' + key_without_folder_prefix
        }
        bucket.copy(
            copy_source,
            key_without_folder_prefix,
            ExtraArgs={'ACL': 'public-read'}
        )
    return f'success deleting all objects in {bucket} and resetting main images.'
Deploying the Project
In order for me to deploy the project, I started by deploying the backend.
First, I ran npm install to get the development dependencies. Then I ran serverless deploy to deploy the backend for the project.
At this point, I copied the API Gateway endpoints into the index.html file to make sure the requests went to the right place. After that my website was ready to go so I ran serverless client deploy to deploy the frontend to everyone.
Then, I uploaded a few example images and tested things out!
A quick caveat - Keep in mind, that I’m using some resources like S3 buckets that are globally unique. If you wanted to replicate the project you’d have to create your own S3 buckets and replace all the instances I reference my buckets directly. I also have the existing bucket with photos that the cleaner function references in order to go out copy the examples back in on a daily basis.
What Next?
Want to keep an eye on my future projects or learn more about serverless technologies? Sign up for my mailing list! If you reply to the welcome email I’ll give you access to all my courses from Pluralsight.com.
You can also keep an eye on the schedule for all the 20 projects in May!
Have questions? Feel free to reach out to me in the comments below or on Twitter! Until next time!